Pages

Tuesday, 29 December 2015

Watercolour Birthday Cards using Liquid Masking


Now that Christmas is officially done, it won't be long until we are getting prepared for the next big holiday -- VALENTINE'S DAY.

But not today.

Today I have two birthday cards for you. I created these cards using liquid masking; a "new to me" product that I had seen several other card making bloggers use and I just had to try. Typically I will stamp the image onto masking paper to protect the space, but with watercolour that doesn't work as well.

For these cards, I stamped out my greetings, then applied the liquid mask. After the masking dried, I used watercolours to make a fun background. It's important to let the background dry before removing the mask so you don't run the risk of the colour bleeding into the white space, or ruining the background in the process of rubbing away the mask.

Once the masking was completely removed I wet the area inside the letters with clean water and dotted in some colour at the top so that the water would pull it down to the rest of the area. 


Green background with blue in the text

Sometimes a card will turn out perfectly and other times not so much. I had considered leaving the second card out, but then I thought that it might be beneficial for others that could learn from my mistake. 

In the card below, you can see what happens when you don't allow the liquid masking to dry completely before applying the colour. In the "Y", the purple seeped through the masking which muddied up the paper when the yellow-green was applied. 

Purple background with yellow-green inside the text. I also used the water drop technique to create a more blotchy or distressed look for the background.
Liquid masking is a fabulous product and I'm sure I'll be using it more in the future. One piece of advice if you are considering purchasing this product: don't get the pure white stuff. Get a brand that is either off-white or pigmented (I've seen blue it in blue), It is incredibly frustrating to realize halfway through that I did't remove all the masking from the card face. Trust me. THAT card definitely didn't make it up here.

Wednesday, 23 December 2015

Monochromatic Thank You


Hi everyone, thanks so much for stopping by!

Today I have a monochromatic Thank you card to share with you all. I wanted to create something simple and delicate that could work for pretty much anything.

The greatest thing about this particular design is that it can be done in any set of colours. Not a fan of green? No problem! Simply change it up and you're good to go!


Clear embossed flowers on pale green with white embossed greeting on dark green cardstock.2015, 

Tuesday, 22 December 2015

Christmas Caroling Critters


Hi everyone, thank you so much for stopping by today! Not only could I not resist one more Christmas card, this card is for the Lawnscaping Challenge #120 "Merry Christmas" sponsored by Lawn Fawn.

After doing so many snowflake themed cards and winter scene cards, I thought it might be nice to mix it up a bit. Today's card features five adorable Lawn Fawn critters out Christmas caroling. 


Supplies used:
  • Distress Inks
    • Chipped Sapphire
    • Dusty Concord
    • Seedless Preserves 
    • Mowed Lawn 
    • Shabby Shutters 
  • Lawn Fawn Stamps
    • Party Animal
    • Holiday Party Animal
    • Stinkin' Cute
  • Memento Tuxedo Black Ink
  • Copic Markers
  • Black Gel pen
  • Strathmore 140lb Watercolour paper
  • Recollections Sparkling Cardstock
  • Random Green Cardstock from my stash
  • Music Note accents

Update: January 2 2016


Honorable Gnome for the Lawnscaping Challenge! WOOHOO!!!
Thank you all so much for your support and encouragement. I'm so happy to be part of this community.

Sunday, 20 December 2015

(Mostly) Single Layer Masculine Card


I have found that one of the more difficult things to do as a card maker is to create cards for men. Most of the stamps and sentiments out there are very feminine. And while it is perfectly okay to give a man a card with flowers and butterflies or cute little critters, it has been far more challenging to create a "manly" card. 

Today's card was created using earth tones and minimal embellishments. Swapping out ribbon for bakers twine takes out some of the femininity that so many of my cards have. Using neutral colours in place of my usual rainbow pallet gave this card a more rustic feel.


(Mostly) single layer card using ombre strips with black heat embossed greeting and focus. 

Saturday, 19 December 2015

Single Layer Thanks on Craft


Now that the Holidays are nearly done, I have been able to give a little bit of love to all the non-Christmas stamps that have been waiting so patiently for me.

I have been finding an increasing need for Thank you cards, a few times a week I'm hunting around through my stash of cards for something that shows my appreciation. Needless to say, that stash is getting depleted at an alarming rate.

That being said, today's card is a sweet single layer thank you card, coloured with PrismaColor pencils.

The cat has three shades of orange and the puppy has four shades of brown, the hearts were coloured with two shades of red then covered in glossy accents to make them shine and give just a touch of dimension. The greeting is coloured in the same shades of red with the darker of the two at the bottom, creating a suble ombre effect that wasn't really picked up by the camera. To ground the image I used four shades of green to create a grassy effect.


PrismaColor pencils on craft cardstock with glossy accents on the two hearts.

Bokeh Birthday


I was so happy with how the Bokeh pattern turned out on my Christmas Card that I couldn't stop! Who would have thought that stamping solid circles could be so much fun?

I created this card for my Aunt's birthday (shhh don't tell, I haven't sent it yet). She has been a wonderful source of encouragement for my card making and there are days where that encouragement saves me from throwing up my hands in despair. 


Pigment ink Bokeh background on watercolour with black greeting.

Wednesday, 16 December 2015

Winter and Holiday Card Series 2015 - Card 24


This card was the result of my youngest daughter asking me what the shiny paper was for, while holding up my remaining piece of glossy paper and sitting on my craft table. Something she knows is not allowed.

While I was conveniently looking for a new card idea, I showed her the alcohol ink marbling technique.

The resulting paper reminded me the way Christmas lights look through a snow storm or a thick fog. Perhaps that's my poetic art side talking, but nonetheless that's where the paper led me.


Alcohol ink marble technique on glossy paper, die cut with snowflake boarder die. Die cut "Merry Christmas" greeting from sparkly paper set on a shimmering background with micro accent gems.

Winter and Holiday Card Series 2015 - Card 23


This set was also from my sister and again it was too cute to set aside. Despite having dozens of other cards to make, it was really great to sit and just let this card fall into place.

Images like this one and the penguins from the previous post, are wonderful for practicing colouring. No matter what your colouring medium may be, having simple but interesting designs to colour are inspiring. You can easily stamp half a dozen of these and try any number of techniques and colour combinations until you find what works best for you.


Copic coloured snowman and penguins with poinsettia patterned paper boarder. I used two shades for the penguins, their hats and scarves as well as the snowman's scarf, and three shades for the snowman's jacket and hat.

Winter and Holiday Card Series 2015 - Card 22


My sister found this adorable stamps set for me a couple weeks ago while she was shopping and I couldn't wait to use it.

I had a lot of trouble trying to find something that would compliment it without taking away from them. In the end I couldn't find anything that wasn't overly distracting so I left it as is. To avoid having the penguins floating about on nothing, I used a W1 marker to ground them, subtle but effective.


Copic Coloured Joy Penguins with poinsettia patterned paper boarder. I used a glitter pen to go over the "Joy", but the camera didn't pick it up well.

Winter and Holiday Card Series 2015 - Card 21


I have found that the best way to respark my creativity is to pull out sets that I haven't used in some time and just let it happen.

We've all seen the beautiful bokeh patterns on the internet. Backgrounds and patterned paper and full of them around the holidays. I was terrified to try it myself, but art isn't really a "sink or swim" kind of thing; art is a "try and try again" kind of thing.

To my absolute joy, this was my first attempt.


Bokeh stamped background, with silver embossed greeting and copic coloured reindeer. I used a mini gem in red for his nose and matted with coordinating coloured cardstock. 

Monday, 7 December 2015

Winter Bunny Tag


Happy Holidays everyone!

Today I have a winter tag for you. I had considered making this the focus piece for a card, but the tag itself turned out to be so sweet that I just had to leave it on its own.

I created this tag for the Lawnscaping Challenge "TAG IT" sponsored by Ellen Hutson.


Products used:

  • Lawn Fawn Dies
    • Tag You're It
    • Stitched Hillside Boarders
    • Mini Snowflakes
  • Lawn Fawn Stamps
    • Ready, Set, Snow (trees)
    • Winter Bunny
  • Shimmering Cardstock
  • Glittered Cardstock
  • 1/4" Blue ribbon
  • Coloured with Copics
  • Gelly Roll Glitter Pen

Hope you all like it! 

Wednesday, 2 December 2015

Champagne Roses Sympathy Card


I have yet to experience anything worse than the unexpected passing of a loved one. After nearly 8 months, it still hits me every now and then that my father is gone, and it's hard to breathe. He was the strongest person I've ever known, working his whole life to create a home for his family.  

The morning before I created this card, I was in the craft store getting some small gifts for my daughters for Christmas. I was in the painting aisle and saw a painting he would have loved to do. He had done an owl before and it is magnificent. The one in the store would have been a beautiful match to it. 

Art has always been an escape for me, but more so now when the emotions remain so raw and painful.
This card is an expression of loss, of the beauty of his life and of my sorrow over knowing that my children will grow up without knowing the incredible man that was their Grandfather. 

And that I miss him more than I could ever articulate.


Clear embossed roses, coloured with PrismaColor pencils, with glossy accent dew drop and champagne metallic thread.

Tuesday, 1 December 2015

Winter and Holiday Card Series 2015 - Card 20


I have another two-way shaker today, this one featuring snowmen. I loved this card so much I made three variations of it in different Christmas colour themes. 

The first two also have snowflakes stamped directly onto the acetate in white StazOn ink. StazOn is the ideal ink for stamping on acetate as it will dry and not smear. Dye and pigment inks will not work because they are unable to absorb into the plastic as they would with paper. The trouble (I find) with the StazOn white ink is that the pad needs to be refilled prior to each use. For that reason I tend to avoid it, however I feel it was a little extra something that this card benefited from.


Two-way green and red shaker with coordinating snowmen, accent ribbon and embossed greeting.


Here is the same card in red and gold.


And again in blue and silver 

Winter and Holiday Card Series 2015 - Card 19


After weeks of making blue and silver themed snowflake cards, it was really nice to just sit and play. I got this stamp set last year, but never really had an opportunity to use it.

While going through my stash, I came across it and just had to open it up. I knew I wanted to create banners with the little guys wishing Happy Holidays, it quickly came together, somehow it's always a quick thing when the focus and the greeting are the same.

The tone on tone background was made with an "ugly sweater" boarder stamp. The longer the card sat, the more the ink faded into the paper creating a very subtle background paper.


Tone on tone "ugly sweater" background with raised die cut gingerbread man banners on gold thread with gold embossed greeting and 4mm sequin accents.

Winter and Holiday Card Series 2015 - Card 18


It's been incredibly difficult for me to come up with something to say about this card. Which is strange because this is currently my favourite card in the series thus far. I may have said that about a previous card, but that would have been before I made this card.

Honestly, the design on this card took a couple days. I knew what I wanted and I was able to see it in my mind, however there was a creative block when it came to setting it out on the paper. It could have been the placement of the trees, rule of odds or some such. No matter what the reason, the time it took and the frustration over the creative block worked out in the end.


Shining snowflake patterned paper background with copic coloured birch trees and white winter fox.

Winter and Holiday Card Series 2015 - Card 17


No two watercolour backgrounds will ever be the same, the way the pigment and the water react with each other is neither predictable nor reproducible. Much like a snowflake, no two will ever be identical.

The watercolour makes this particular set of cards completely unique and elegant.


Gold embossed greeting on shimmering background with watercoloured snowflake edged panel and micro diamond accents.

Winter and Holiday Card Series 2015 - Card 16


I've done dozens of shaker cards in the past, but when I saw a technique that removes the bulk of the card I just had to try it. This card is a two way shaker, meaning that open or closed you can see the shaker.

Having less bulk in a card allows for easier mailing and a reduced risk of getting damaged while being tossed about in the postal system.

Any card maker with experience in shakers will tell you that there is nothing worse than finding out the time (potentially hours) put into making a shaker card was all for naught because of postal damage. While I personally love the dimension that a traditional shaker has, this technique is far more mail friendly.


Two-way shaker card with copic coloured winter penguin skating on glossy ice with Christmas twine accent.

Winter and Holiday Card Series 2015 - Card 15


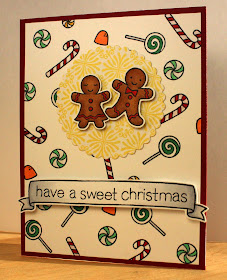
Peppermint and gingerbread go hand in hand when it comes to Christmas.

This card captures the sweetness of the holiday and makes a perfect card for anyone on the mailing list. The raised gingerbread cookies and greeting banner add a bit of dimension and interest to the card.


Sweet candy background, featuring copic coloured gingerbread people with raised banner greeting.

Winter and Holiday Card Series 2015 - Card 14


Over the last few years, owls have become very popular at Christmas. We can see them more and more in holiday decor, so for the person on everyone's list that loves these feathered critters there is no better card than one with owls.


Shining snowflake patterned paper with three copic coloured winter owls, with stitched hillside boarder snowbank.

Winter and Holiday Card Series 2015 - Card 13


In making this card I wanted to capture a little bit of the fun that comes with winter. The winter season can last up to six months in Alberta so winter activities are as much a part of our lives as summer walks and flowering gardens. Even spring bunnies need to find something to amuse themselves for the rest of the year.

This bunny is making the best of his time while wishing you all a very Merry Christmas.


Shimmering "Merry Christmas" background with stitched hillside boarder snowbanks and copic coloured winter rabbit.

Winter and Holiday Card Series 2015 - Card 12


Warm scenes make for a warm heart.

I made this card with a couple different stamp sets. One of the best things about Lawn Fawn is most of their sets are incredibly compatible with each other. It makes creating unique scenes so much easier to do.


Glittered snowbank with snowflake background, Copic coloured trees and house with raised winter fox.

Winter and Holiday Card Series 2015 - Card 11


Welcome to December! The weather in Calgary has been beautiful which has been great for me because I don't really like winter. I do, however, like making winter cards (as if you couldn't tell that already).

I just had to use this little snowman again. His playful and welcoming pose is too sweet.


Faded snowflake background with angle focus piece, featuring silver embossed greeting and raised copic coloured snowman with glittered rim and pompom.

Wednesday, 18 November 2015

Winter and Holiday Card Series 2015 - Card 10


Hi everyone! Thank you so much for visiting today.

Today's card is more on the whimsical side. This adorable snowman wishes you all a very Happy Holidays!

I've coloured him with copics, adding white glitter for the pompom and the fur on his cap.


Shimmering embossed snowflake background with raised silver embossed greeting. Blue ribbon accent with coloured snowman on a sparkling snowbank.

Monday, 16 November 2015

Silver Embossed Birthday Card


Once again, less is so much more.

I'm absolutely loving this flower set and I'm finding so many ways to make it look elegant and unique. The silver embossing makes the card shine, sadly I was unable to fully capture that in the photo.


Silver embossed greeting and flowers on matte black cardstock with white embossed flower on pink vellum accent.

Tuesday, 10 November 2015

Winter and Holiday Card Series 2015 - Card 9


Sometimes, I can sit and stare at blank paper for hours waiting for the piece to 'speak to me' (as it were). Then suddenly it is like a floodgate opens in my mind and the card becomes completely formed.  It is a lucky day when the paper reflects exactly what my imagination saw. Today was one of those days. I was about to give up and then there it was.


This card features an embossed snowflake background, framed with shimmering navy boarder and raised gold embossed greeting focus with navy gem accents.

Watercolour Sympathy Card


No one likes to talk about it. No one likes to think about it, and we certainly do not plan what to say or do in the event that it happens. But it does happen.

Sooner or later we are all touched by death. Whether you have lost a close friend or relative, or you find yourself as a pillar of support for someone else to lean on during a difficult time, you will be faced with sadness and uncertainty.


No line watercolouring of black-eyed susans and butterfly with gold embossed greeting and three edge boarder.

Saturday, 7 November 2015

Custom Request Cardinal to Blue Jay


This card was custom made by request based off of the watercolour Cardinal from the Winter and Holiday Card Series 2015 - Card 3. While she liked the Cardinal, she likes Blue Jays far more. Luckily for me the differences (aside from colour) between a cardinal and a blue jay are few, and she was incredibly pleased by the result.


Watercoloured Blue Jay with gold embossed greeting and shimmery snowflake accents.

Winter and Holiday Card Series 2015 - Card 8


Today's card features an older stamp set that's been in my Christmas supplies box. I like to keep my Christmas supplies separate from the rest of my craft supplies, that way when I open it at Christmas (and by Christmas I mean the middle of October), it's like I have all new stuff to play with.


Silver embossed tree on raised shimmery oval focus. Snowflakes are stamped in navy ink on shimmery cardstock, with matching navy boarder.

Friday, 6 November 2015

Missing Spring Birthday Card


I love designs that fall within a monochromatic theme. This birthday card was made because I was running low. It is never ceases to amaze me when I go to grab a birthday card and find that there aren't any left! Where do they all go?


Copic Coloured butterflies, with Wink of Stella clear glitter to make them shine. It really is a shame the camera doesn't pick that up. Happy Birthday is die cut from shimmery paper and adhered with Ranger's Multi Matte Medium to ensure they won't go anywhere.

This design is especially appealing to me because it can be easily adjusted and become a Thank You card, Anniversary card, A Hello card or just about any other type of card you can think of. I'm sure you'll see this again on the blog in the future.

Canadian Citizenship Card


My Fiancee's friend Chris recently received his Canadian Citizenship, here is the card I made for him in celebration. I wasn't able to attend the party that was thrown for him, but he did take me aside at a later date to thank me for the card. I'm really glad he liked it.


Sorry about my thumb in the picture. I just snapped it with my phone. At the time, I didn't think to set it up and take a good shot. Even still, the picture didn't turn out too badly. (Yay, Canada!)

Winter and Holiday Card Series 2015 - Card 7


Once more the chill of blue and snowflakes called to me in this card. As a card maker, it is sometimes difficult to remember that less is more.

While it can be very tempting to use several techniques on a single card, that doesn't mean it will be better. There are times when even the smallest thing can be very technically challenging even though it looks ridiculously easy to do.


Gold embossed, raised greeting focus over embossed snowflakes on a blue centre-fade ombre background with gold strip accent.

Winter and Holiday Card Series 2015 - Card 6


It didn't really occur to me, until I was speaking with my Mother-in-law, to include a more religiously toned card in the series. I'm glad that she requested it, because the card turned out to be beautiful.

I wanted to keep this card simple and allow it to speak for itself.

Originally I had used a matte black instead of the shimmery background and while it looked good, my sister pointed out that black wasn't really a "Christmas" colour. Then I moved to a shimmery blue background and that didn't speak to me at all. I liked the black, but I loved the elegance of the shimmer. I think the card came together with the best of both options.


Gold embossed baby Jesus silhouette and greeting on shimmering black background with a gold sparkle boarder on the top and bottom.

Winter and Holiday Card Series 2015 - Card 5


This card was so much fun to make. Not only did I get to include snowflakes, glitter and watercolour, I was also able to place it on a completely clear card base. 

This card can be displayed in either landscape (shown below) or portrait orientation, depending on your preference.


Sparkling snowflakes inlaid in marble watercolour background, framed in sparkling silver on a unique clear card base.

Winter and Holiday Card Series 2015 - Card 4


This card has a raised and embossed shimmery snowfall background with raised greeting focus. Sparkling "Joy" over silver embossed large snowflake, with silver accent strip and colour matching twine for added interest. The above in scarlet and below in blue.


Winter and Holiday Card Series 2015 - Card 3

To me, a classic sign of the Holidays is the Cardinal. The stark contrast between his bright plumage and the white of snow helps him to stand out as a sure symbol of the season.


Watercoloured Cardinal with gold embossed greeting and shimmery snowflake accents. Barely visible around him is a frosted blue aura, this helps him to stand out against the background and additionally lend to the illusion of winter.

For a different take on this card, as a custom request please see this post.

Winter and Holiday Card Series 2015 - Card 2

I'm sure it is becoming very clear that I adore Snowflakes. They are featured on nearly all my winter/Christmas cards. There is something about their beauty and delicacy that appeals to me. Each one is unique just as people are.


Raised and embossed shimmering snowflakes add a perfect backdrop for a bold and sparkling Merry Christmas greeting. The above card has the greeting in deep red, below the greeting is in blue.


Winter and Holiday Card Series 2015 - Card 1

Whether it be Christmas, Yule, Solstice, or simply Happy Holidays; there's a card for it. Over the next few weeks I'll be showing the Winter cards I have created for 2015.

So let's dive right in!


This card features a blue ombre feature strip with sparkling die cut snowflakes and an embossed greeting in matching blue ink.


Here is the same design replacing the blue snowflakes and greeting with silver.