Pages

Tuesday, 31 October 2017

Happy Halloween 2017!!


Happy Halloween everyone!!! I hope you're in for a spooky day.

It is my favourite holiday and the best time of year to get new decor for the house. LOL

I know that I have started my Christmas series and that I said I was done Halloween, buuuut it's actually Halloween and I couldn't possibly post a Christmas card. That would be insanity.

So today, I have a super cute jack-o-lantern card to bring in the spooky day.


To begin, I cut a piece of 110lb white cardstock with the second largest of Lawn Fawn's "Stitched Rectangles" and a piece of black 65lb cardstock with the largest.

I then stamped the background words with CTMH Whisper ink. To create the face, I cut out the masks from 2" Post-It tape and placed them where I wanted them. I then sponged on Dried Marigold, Spiced Marmalade and finally Carved Pumpkin on the very edges.

I then removed the masks and tied a piece of natural twine around the top of the front panel. I adhered that to my black panel then the whole piece to the front of a standard A2 sized card base.

To finish off the card I used two large enamel dots and adhered them as eyes, I used a sharpie to make the middle part.

I think if I were to make this card again, I would have left the eyes out. But it's me, and we all know that I just can't leave well enough alone. The card actually ended up being a touch scarier than I had originally wanted it to be.

I hope you like today's card and are inspired to create something of your own. If you haven't already, please follow me on the right side bar or over on Facebook, so you don't miss any future posts. Drop me line in the comments section below and let me know what you think.

Monday, 30 October 2017

Quilled Floral Birthday


Hi everyone, thank you for stopping by. I hope you're having a great day.

Today, I thought I'd share something that has fallen way out of my comfort zone. Before I got into the stamping and the colouring and the embossing and the watercolour, I used to quill.

For those of you that are unfamiliar with quilling, it is the art of rolling strips of coloured paper and putting them together to create a scene. If you take a moment and hop over to YouTube there are some insanely intricate pieces that are absolutely amazing. I'm not like that. It's plain and simple for me, but it is fun watching a piece come together.


To begin, I rolled out all the pieces I needed and shaped them as necessary. I have found it best to have a sketch handy and a list of all the pieces I need so that everything is there when you need them.

I wrapped a length of satin ribbon around a piece of pink textured paper for my very back panel and adhered that to the front of an A2 sized card base. I then cut a square of off-white cardstock and rounded two of the corners.

I then stamped the greeting using Memento Tuxedo Black ink. I found it best to make sure that all the stamping is done before adding any of the quills. For this piece I used 1/8" wide strips and would have been unable to do the stamping if I glued them down first.

I then adhered each piece down to the paper using Tombow Mono Multi Glue. I've found it best to add the glue to the piece and lay it down instead of adding glue to the base and putting the piece on top. No one likes it when it seeps out the side. For the stems, I simply took a length of the paper in green and adhered it on its side. No rolling for those ones.

Once all the pieces were in place I used a large acrylic block as a weight so that they would dry flat.

I hope you like today's card and are inspired to create something of your own. If you haven't already, please follow me on the right side bar or over on Facebook, so you don't miss any future posts. Drop me a line in the comments section below and let me know what you think.

Sunday, 29 October 2017

Product Review Series | T'GAAL Multi-Sharpener by Kutsuwa


Hi everyone, thank you for stopping by. I hope you're having a great day.

I've done a lot of coloured pencil reviews and as anyone who uses pencils knows, they have to be sharpened.

There are dozens of sharpeners out there, by dozens of companies all promising the best results. Sadly, we know that this is not necessarily the case. They don't all provide excellent results.

Moreover, what works for one person may not work at all for another. For a long time, I was using an electric sharpener. When you have soft-core pencils (like Prismacolor Premiers) it can be very frustrating to get them sharp. The soft core means a higher chance of breaking, and when it comes to manual sharpening it is nearly impossible to hold the pencil still while sharpening and ultimately the pencil breaks.


I have seen numerous colourists and pencil artists talk about the T'GAAL sharpener so I thought I would give it a try myself.

  • Quite expensive 
  • 5 settings for pencil points
  • Self contained - you don't have to hold it over the rubbish bin
  • Comes in various colours
  • Incredibly sharp blade
  • Light weight

This sharpener fit nicely in the palm of your hand and is very light weight. It doesn't take up much room if you are travelling with your pencils. It fits a standard pencil as well as the slightly larger pencil (like Faber-Castell Polychromos). 

It comes in several colours - while not important to the function, it's always super fun to have choices.


Each of the five different settings allows you to change the angle of the point, depending on what you prefer. The first point is very much like the way most presharpened pencils come from the factory, and as the number goes up, so too does the angle of the pencil point.

When I was using my electric sharpener it resulted in what would be a five (shown above). While I loved the point, I found that if the tip broke because of how long the point was I was wasting a lot of pencil to get the tip sharp again. When you work with pencils that are upwards of $2.00 each, it becomes important to keep waste in mind.

Since I switched to the T'GAAL, I'm finding less and less waste as I personally only use setting number one. I like to keep my pencils very sharp which means I'm sharpening them often during the course of a project - setting one keeps a sharp point but short so that I'm breaking the ends less often. Many times it doesn't even feel like the pencil is sharpening and yet out comes a lovely point.

Overall, I'm incredibly impressed by the T'GAAL Multi-Sharpener, despite being (what I consider) ridiculously expensive for a small manual sharpener, I can honestly say it is worth every cent. When I purchased mine from my local art store I paid about $10 CAD, when my husband was looking for a new sharpener, I sent him to get the same one (because I don't like to share) and he paid double that at the same place.

Honestly, worth it. I will not hesitate to spend the same amount for another of these sharpeners. So if you are able/willing to use a manual sharpener for your pencils, I don't think you have to look any further than this one.

I hope you enjoyed today's review. If you have any questions about this product or an idea for a future review, please drop me a line in the comments section below. If you haven't already, please follow me on the right side bar or over on Facebook, so you don't miss out on any future posts.

*disclaimer: I am not sent products to review, nor am I paid to review them. I review the products that I personally use, that I find interesting and that I have purchased with my own money. I receive no incentive, payment or reward to review a product. All reviews are based on my experience using them and are my opinion only.

Saturday, 28 October 2017

Happy Holidays Series | Peek-a-Boo Santa ft. Clearly Besotted & Lawn Fawn


Hi everyone, thank you for stopping by. I hope you're having a great day.

I've put it off as long as I can. I had hoped to start next week, but I just can't wait any longer! I'm so excited to begin this year's Happy Holidays Series.

I'm going to start the year with a fun interactive card featuring Lawn Fawn Dies and Clearly Besotted Stamps.


To begin, I used the largest of my "Stitched Rectangle" dies by Lawn Fawn to cut out my front panel, from 110lb Copic-friendly cardstock. I then used the smallest of the "Lift the Flap" dies to cut three flaps that will make up the interactive part of the card.

I used Tumbled Glass Distress ink to shade at the top and fade out to white as it moves down the card. Once that was dry, I put the panel in my MISTI and stamped the tree and the main greeting from Clearly Besotted's "Santa Baby" set, using Memento Tuxedo Black ink. I stamped the three little instructions from Lawn Fawn's "Push Here" stamp set.

I coloured the tree with Copic markers and added Glossy Accents by Ranger over the star and the ornaments.


I lined up the top panel with another of the same size and stamped three of the Santa images from Clearly Besotted, then coloured each of them with Copic markers.

I adhered the two panels together, being careful not to put adhesive behind the flaps that are to lift up. I then used a tiny bit of Tombow Mono Adhesive at the bottom of each flap and let that dry. This liquid adhesive is fantastic, as it can be made permanent if applied when wet, but if you let it dry it becomes a repositionable sticky tab, allowing the flaps to be open and closed multiple times.

The adhesive will wear out over time, but I've opened and closed these tabs at least a dozen times because these images are just so stinking cute that I couldn't resist and the tab is still going strong.

I hope you like today's card and are inspired to create something of your own. If you haven't already, please follow me on the right side bar or over on Facebook, so you don't miss any future posts. Drop me a line in the comments section below and let me know what you think.

This card is for:
Christmas Card Challenge

Crafting from the Heart 

Friday, 27 October 2017

Fairy Happy Birthday | Lawn Fawn "Fairy Friends"


Hi everyone, thank you for stopping by. I hope you're having a great day.

Birthday's are generally magical when you're small - all those people coming to see you, and the party and the cake and the presents. As you get older, I've found that they start to become just another day. Which is sad when you think about it. There are so few things that we as adults get as excited for as a child whose birthday is nearly upon them.

Today, I wanted to share this super sweet fairy birthday card that I created for a little girl who is turning 6 very soon.


To begin, I stamped the fairy and the house from Lawn Fawn's "Fairy Friends" stamp set with Memento Tuxedo Black ink on 110lb Copic-friendly cardstock. I used the scallop border from MFT Blueprints #27 to cut the front panel.

I masked off the house and added the flowers and the little rock path from the same set and coloured everything with Copic markers.

I masked off all my images and the scalloped border and used Cracked Pistachio and Mowed Lawn Distress inks for the grass, Shaded Lilac, Milled Lavender, Spun Sugar and a bit of Victorian Velvet for the sky.

Once the background was completely dry, I stamped the greeting (also from "Fairy Friends") and added the chunky star glitter by the fairy.

To finish off the card, I popped the panel up on some foam tape and adhered that to a piece of pink paper and then mounted the whole piece to the front of a standard A2 sized card base. For just a bit more sparkle, I used my Quickie Glue pen by Sakura on the petals of the house and on the fairy's wings then sprinkled them with Lawn Fawn's fine Prisma Glitter.

I hope you like today's card and are inspired to create something of your own. If you haven't already, please follow me on the right side bar or over on Facebook, so you don't miss any future posts. Drop me a line in the comments section below and let me know what you think.

This card is for:
Sunday Stamps Challenge


Thursday, 26 October 2017

Coloured on Kraft | Troll Party ft. Your Next Stamp "Insanely Happy"


Hi everyone, thank you for stopping by. I hope you're having a great day.

Today I'd like to share this super cute birthday card I created using the "Insanely Happy" stamp set by Your Next Stamp. This is a new (to me) stamp company with super cute images and clever sentiments. Given the popularity of the Trolls movie that recently came out, I thought that this set would be a perfect one to start with.

The images can work for both a boy or a girl; don't have to be for birthdays and are super fun to colour.


To begin, I created masks of all the trolls in the "Insanely Happy" stamp set by Your Next Stamp. I then used the MISTI to stamp the two outer trolls, masked them then stamped the third, masked her and finally the last troll.

I removed all the masks and coloured the images in with Prismacolor Premier pencils (you can see my review of those here). I'm still having trouble with natural skin tones when using the coloured pencils, so colouring these trolls was super fun!

I used three shades for each of the different colour skins, four shades for each of the hair and two shades for all of the clothes. Typically, I would use more shades for the clothes but these are very small areas and don't require as many shades to get a good blend.

Once I was certain I liked the colouring, I put the panel back into the MISTI and stamped the greeting. All of the stamping was done using Memento Tuxedo Black ink. Not because it's required, but out of habit.

I then traced the "Have An Insanely" portion of the greeting with my Quickie Glue pen by Sakura and sprinkled Lawn Fawn's fine Prisma Glitter over the letters. Since the Trolls movie, all trolls must have glitter! Sadly, the writing is obscured in the picture, but in real life it sparkles and you can read it. WIN!

To finish it off, I used the Imaginisce i-Rock heat tool to add the coloured embellishments around the greeting. I've had this tool for ages, and I keep forgetting that it's around. Then adhered the kraft panel to the front of a standard A2 sized card base.

I hope you like today's card and are inspired to create something of your own. If you haven't already, please follow me on the right side bar or over on Facebook, so you don't miss any future posts. Drop me a line in the comments section below and let me know what you think.

This card is for:
Seize the Birthday

Wednesday, 25 October 2017

Sympathy Silhouette | ft. Distress Oxide Inks


Hi everyone, thank you for stopping by. I hope you're having a great day.

A while back I did a comparison between Distress Inks and Distress Oxide Inks (you can see that post here, Distress Showdown) and I showed the most common uses for my current collection of regular Distress inks and how the Oxides compared.

This was the first time I stamped over a Distress Oxide background, and I'm beyond impressed with the results. I cannot believe how crisp the images turned out, with the help of the MISTI, of course.

I have been holding off on getting more Oxides because I didn't know if I really wanted duplicate inks that didn't come in the mini cubes taking up space - as we all know the space we have is precious. This really tipped the scales for me, and I have a list going of my most used Distress inks that I want to get in the Oxides. I was so pleased with how the background turned out and the crisp stamping on top that it is definitely worth the space they large pads will take up.


To begin, I sponged Salty Ocean and Broken China Distress Oxide inks over my panel to create a very subtle ombre look, with the darkest in the lower left corner. I then used my Distress Sprayer to spritz water over the panel, let that sit for about 20 seconds then blotted it dry with a clean paper towel.

Once the panel was completely dry, I put it in my MISTI and stamped the floral silhouette from Inkadinkado and the greeting from (Recollection, I think) with CTMH Archival Black ink. I did notice that the Archival ink stayed wet a bit longer than it normally would, as though the pigment in the Oxides created a barrier. So stamp with caution! Wait until it is dry before touching. Smearing is likely to occur.

Once the ink was dry, I used a piece of black twine to create a bow. I would love to find twine that doesn't have all these little hairs sticking out of it. I love twine, but I do not love this.

I then mounted the coloured background to a piece of black cardstock, then adhered the whole lot to the front of a standard A2 sized card base.

I then used my Nuvo Crystal Drops (gloss) in Ebony Black to add a bit of detail. The more I use these drops the more I absolutely love them (foreshadow - review/comparison coming soon!) I'm less happy about the 24 hour cure time on the drops, but frankly the finished product is well worth the wait.

I hope you like today's card and are inspired to create something of your own. If you haven't already, please follow me on the right side bar or over on Facebook, so you don't miss any future posts. Drop me a line in the comments section below and let me know what you think.

This card is for:
Simon Says Stamp Wednesday Challenge

Tuesday, 24 October 2017

Rustic Thanks | ft. Lawn Fawn "Stitched Leaves" Dies


Hi everyone, thank you for stopping by. I hope you're having a great day.

Remember when we all first started out and punches were like the coolest thing? Punches and stickers and those scissors with the funky cutting edges. Today I wanted to share a card that doesn't have any image stamps or colouring.

Today's card features the "stitched leaves" dies from Lawn Fawn and two paper punches. One from Martha Stewart and the other from Recollections. Sometimes it's fun to take a step back from everything we do right now and try something that we would have done years ago.


To begin, I die cut all of the leaves using Lawn Fawn's "Stitched Leaves" dies out of Kraft cardstock by Recollections. I also punched out four of the daisies (Recollections) and three of the leafy fronds (Martha Stewart) out of the same cardstock.

I then used Distress inks and CTMH pigment inks to add some colour to the leaves. For the pigment inks I used a finger dobber as I wanted a more stippled look instead of the smooth blend that I get from the sponging tool and the Distress inks.

I set those aside to dry, and used the finger dobber and CTMH pigment inks on the front of the card base to add some additional colour and make the background look a little out of focus.

Once that was dry I arranged my leaf pieces the way I wanted them and adhered them in place using liquid adhesive.

I then stamped the greeting from an old Recollections set using Gathered Twigs Distress ink in my MISTI (just to ensure that I got a good image).

To finish it off, I added a bow with natural twine.

I hope you like today's card and are inspired to create something of your own. If you haven't already, please follow me on the right side bar or over on Facebook, so you don't miss out on any future posts. Drop me a line in the comments section below and let me know what you think.

This card is for:
Muse Card Challenge
Inspiration card by Stephanie Lanzalotto


Simon Says Stamp Monday Challenge
 Thank you all so much for your votes and support!

Monday, 23 October 2017

Coloured on Kraft | ft. MFT "Our Story"


Hi everyone, thank you for stopping by. I hope you're having a great day.

Yesterday, I posted a review of the Prismacolor Premier coloured pencils and showed an example using them of Kraft cardstock. Today I have the card that I created using that piece.


To begin, I stamped the images from MFT's "Our Story" using Memento Tuxedo Black ink on 65lb Kraft cardstock by Recollections.

I then coloured the images using Prismacolor Premier coloured pencils.

I adhered the panel to the front of a standard A2 sized card base using my tape runner.

I then put the card in the MISTI and stamped the greeting from the same set using Memento Tuxedo Black ink.

I hope you like today's card and are inspired to create something of your own. If you haven't already, please follow me on the right side bar or over on Facebook, so you don't miss any future posts. Drop me a line in the comments section below and let me know what you think.

Sunday, 22 October 2017

Product Review Series | Prismacolor Premier Coloured Pencils


Hi everyone, thank you for stopping by. I hope you're having a great day.

I have been promising this one for a very long time, and I'm happy to say I'm finally ready to deliver. Perhaps it is the cooler fall season, but I've been using the Prismacolors a lot more often in my work. I've also been using Kraft cardstock more often and honestly the two just go together like tea and biscuits.


Prismacolor Premier pencils have been around for some time, established by the Eagle Pencil Co. in 1938 in New York City.  The company has changed hands a few times since then and now has a total of 150 vibrant colours in it's palette.*

  • High Quality - Artist Grade Pigment
  • Widely available in stores or online
  • Available in sets or open stock
  • Soft core - allows for smooth application of colour
  • Wax based
  • Blending pencils available


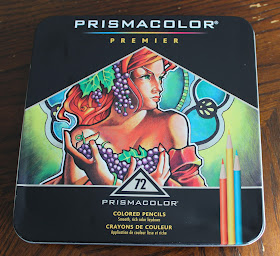
I personally have the 72 set, and for the purposes of this review I will be using them on 65lb Kraft cardstock from Recollections.

If you shop around, you can certainly find a set that fits within your price range. Don't get me wrong, these pencils are not cheap. In Calgary, I can purchase them open stock for about $1.90/each plus tax. This is not a grade-school investment. I ordered my set off Amazon (Canada) in the spring as they were having a sale and I just couldn't pass it up.


The pencils come pre-sharpened, however there seems to be a lot of extra room in the tin so during shipping there was some damage to the tips.

I expected this. I have long been reading reviews from other colourists and pencil artist discussing how the quality of Prismacolor has been declining. Perhaps this is true. I bought my first set nearly a decade ago, and from my experience the quality is the same now as it was then.

I have personally had some trouble with a couple I have purchased open stock, as they get touched by people and knocked about by children and dropped on the floor.

These are a soft core, wax based pencil so they are more delicate. I found that with the few I had breakage issues with, by changing my sharpener I was able to greatly reduce my frustration. For a while I had been sharpening with an electric sharpener as it gives more stability and control - basically you just hold the pencil there; then I switched to the T'Gaal manual sharpener. I've since put away all my other sharpeners. There will be a review of this sharpener. (Spoiler - go buy it!)

I have also had one or two instances where the casing has split down the length of the pencil. Again, I expect something like this when you ship wood through dry areas. If you use a piece of thin washi tape and wrap it tightly - but carefully avoid as much overlap as possible - you can stabilize your pencil and still sharpen right through the tape. It may be annoying but in my opinion it is a small price to pay for the quality of pigment.

If you get a set and there are a significant percentage that are damage, split or broken then by all means send them back, that only makes sense.


I stamped these images from MFT's "Our Story" with Memento Tuxedo Black ink (out of habit) on 65lb Kraft cardstock by Recollections.

Each object has a minimum of two shades (for the books) and a maximum of four shades (chair and side table) for shading.

Observations:

  • If coloured pencils aren't your typical medium they require practice. I normally colour my scenes with Copic markers and my technique for laying down the colour is completely different. With Copics I start with my medium shade, then darkest then lightest. However with pencils I start with my lightest and work to my darkest shades. You have to find what works for you.
  • You must use an incredibly light hand. Unless you are working on high-end artist paper with lots of tooth, you have a limited number of layers before you just can't put down any more colour. The pigment in the pencil sticks to the little bumps (tooth) of the paper, once those are smoothed out - there is no more layering.
  • Keep your pencils sharp. There is literally nothing worse than trying to colour with a dull pencil. I don't know how I used to do it. I don't know how my kids do it - I can't even look. Find a sharpener that works for you and stick with it. 
  • If you are colouring stamped images such as this one, and you like that bold black outline, your multi-liner or pigment pen will not work over this. The wax and the ink aren't friends. They don't like each other and they don't want to play together. Use the black pencil and carefully go over your lines. I used this technique in the example above and you would never know that it wasn't the original stamped lines.
  • Pencil colouring takes way longer than colouring with alcohol markers. I'd say this little scene took me about an hour to do. Had this been with Copic markers, I could likely have been done in 10 minutes. Maybe less.
  • Do away with the blender pencil (in my opinion). Take the time to learn how to get the blend you are looking for with just the colours that you want to use. I found the blender pencil added an additional waxy bloom to the area with no real benefit. All it did was mash down the tooth of the paper and stop me from adding more layers. I tossed it and forced myself to learn how to blend without it and I'm happier and feel more accomplished for it.
  • Pencil colouring is a labour of love. If you are in a hurry or have a lot of copies to get done this may not be the medium to choose at the moment. I don't mass produce cards that are in pencil. They are reserved for close friends and family members.
Overall, I feel Prismacolor Premier pencils have been getting a bad rep for no real reason. Sure there are a few out there that were missed by the quality inspectors but tell me a product that has never had a problem. I can't think of one. For the dozen or so sets and brands of coloured pencil (both wax and oil based) I have, I still reach for my Prismacolors first. 

They layer well, there are an amazing number of colours and they are easily accessible. I haven't come across a wax based pencil with a higher pigment quality, so really the price is not that ridiculous. Shop around. 

There will likely be one or two in the bunch that are damaged, maybe repairable but maybe not, but think about the number of pencils that are being produced. Should there be a tighter watch on the quality of the pencils as they come off the line? Probably, but that can be said of any company with nearly any product. 

Despite the shortcomings and horror stories that you read floating about the internet, these coloured pencils are a fine addition to an artist's craft room. My only regret is not purchasing a larger set when the sale was going on.

I hope you enjoyed today's review, if you have any questions about this product or a suggestion for a future review please leave me a comment in the section below. If you haven't already, please follow me on the right side bar or over on Facebook, so you don't miss out on any future posts.

Click here to see the card created with this example.

**disclaimer: I am not sent products to review, nor am I paid to review them. I review the products that I use, that I find interesting and that I have paid for with my very own money. I am given no incentive, payment or reward for a review. All reviews are based on my experience with the product and are my opinion only.


*reference

Saturday, 21 October 2017

Technique Tip | Adding Gilding Flakes After Colouring an Image


Hi everyone, thank you for stopping by. I hope you're having a great day.

For last week's product review, I discussed the Nuvo Gilding Flakes by Tonic Studios. In that post, I briefly touched on a fun technique where you add the flakes after you've coloured an image. I had promised a card using this technique but then I got sick and my daughter got sick and my other daughter got sick and frankly it was a whole sickly mess.

Today I have that card for you. I'd like to walk you through my process and discuss some of the things that I learned along the way.


There are a few things you're going to need:

  • MISTI - I can't line up a stamp to save my life after it's been stamped. Even the clear ones, so the MISTI has become an invaluable tool. If you are able to do this with an acrylic block then I envy you.
  • Heat embossing supplies - Powder Tool, Sticky Embossing powder by Ranger, Gilding Flakes and a stiff brush
  • Swiffer or Duster cloth to catch all the stray flakes and dust
  • Images to stamp and colour
  • Colour Medium of your choice - I'm using Copics


To begin, I stamped these leaf images from Inkadinkado using Memento Tuxedo Black ink on 110lb Copic-friendly cardstock. I arranged these cling stamps in my MISTI so that after stamping I could turn the panel upside down and stamp the images a second time with without having to move them. I then coloured them with Copic markers.


After the images were coloured, I prepped the panel with my powder tool and returned it to the MISTI. I inked up the stamps using VersaMark ink and used Sticky Embossing powder by Ranger to cover the lines of the original stamping, and used my heat tool to melt the powder.

As you can see from the little leaf on the right, my stamp moved slightly and I despaired; I had originally thought to toss the panel and start over but then I thought that this would make an excellent practice piece - because you can never have too much practice when it comes to a new technique. Moreover, I'm a big fan of trying to save the card - so on I trudged.


The trick with this powder is to not over heat it. If you do the powder it will lose it's stickiness and defeat the purpose. This happens here too as you'll see in the next photo, but again - I trudged on.

I added my Sunkissed Copper flakes, patting them down with my finger to ensure they were sticking to the embossing, I then use the stiff brush (mine is from Faber-Castell, but you can use an round stiff brush) to burnish away the extra flakes.

Don't forget to breathe softly during this part. These flakes are light as air and one sigh will have flakes floating about your work space like metallic snow on a clear day.


Once the flakes had been swept away, I was left with this beautiful panel. The light is tricky in my craft room, but they really do shine.

On the right middle leaf you can really see how the stamp had misaligned and the gilding did not cover the original ink lines. You can also see on the same leaf how I had over heated the sticky powder and it no longer was sticky. Again, I thought to toss it. But all experiences are learning experiences in the craft room, and frankly I was very pleased with how the rest of the leaves turned out.


I used a finger dobber and sponged in Weathered Wood Distress ink to fill in the white space between my leaves. I prepped a piece of vellum and heat embossed my greeting using Copper Embossing powder by Recollections.

I added some glue drops behind the letters and wrapped the band around my panel. This mostly covered up the errors that I made on this card. As I looked at it, I actually liked that worn look that my errors had resulted in. To me, it created this rustic finish which worked for the card. If this were not a fall card I likely would have started new.

I mounted that to a piece of green cardstock and then adhered the whole lot to the front of a standard A2 sized card base.

Somethings I learned:

  • Make sure your cling stamps are actually stuck to the MISTI door. That's what happened with the one leaf. It wasn't stuck properly and that's why it moved. Had it been a clear stamp, I could have lined it up more easily but as a cling I had to roll with it.
  • I would have done one leaf at a time. Heat embossed, applied flakes then burnished them away and moved on to the next. I think the reason I over heated some areas was because I did the whole panel at once.
  • It would totally have been possible to skip the initial stamping - just gilded from the beginning and then coloured the images in, but I was concerned about what the flakes would do to the tips of my markers. While I'm certain I would have been very careful, I find it best to play it safe - especially when it is a technique that I am not familiar with.

I hope you like today's card and are inspired to create something of your own. If you haven't already, please follow me on the right side bar or over on Facebook, so you don't miss out on any future posts. If you have any further information regarding this technique, please drop me a line in the comments section below and let me know what you think. I would love to hear from you!

Friday, 20 October 2017

International Sloth Day | ft. Lawn Fawn "Hang in There"


Hi everyone, thank you for stopping by. I hope you're having a great day.

One of the endless questions I get as a mother of a five year old, is "What's your favourite animal?" or colour, or shape, or letter, or number; the list goes on and on. Anyone with kids will tell you that the barrage of questions never stops. It's true. Their little minds are growing so fast and they seem to pull the information in like a sponge. For me, I get the same questions over and over as though maybe I wasn't telling the truth the whole time. Who knows?

For the record, my favourite colour is coral, my favorite shape is an oval, my favourite letter is a "g", my favourite number is 32 and my favourite animal is a sloth.

I recently read about fossils of a new giant sloth species that were found and this thing was the size of an elephant. An elephant. Think about that for a moment. A friggin' elephant.

Yesterday, was international Sloth day, sadly today's card is a day late, but better late than never. And really, is the sloth going to complain about it being slow?


To begin, I cut the scalloped layer using MFT Blueprints die-namics #27 out of some heavyweight green cardstock. I then trimmed down a piece of 110lb Copic-friendly cardstock to fit within the stitched area of the scalloped piece.

Using Memento Tuxedo Black ink, I stamped the sloth image from Lawn Fawn's "Hang in There" set and added the little leaf cluster three times. I created masks for all of the images and used the negative space from a circle die cut to sponge Cracked Pistachio Distress ink around the image. I then used the positive of the circle to mask that off, and sponged Twisted Citron around the rest of the panel.

I used a bamboo background stamp from Hero Arts in the MISTI with the same Distress inks to get the jungle impression.

I removed all the masks and coloured the image in with Copic markers. I then adhered my panels together and mounted them to the front of a standard A2 sized card base.

I hope you enjoyed today's card and are inspired to create something of your own. If you haven't already, please follow me on the right side bar or over on Facebook, so you don't miss out on any future posts. Drop me a line in the comments section below and let me know what you think.

This card is for:
Freshly Made Sketches

Crafting with an Attitude

Thursday, 19 October 2017

Clean and Simple | Tropical Birthday ft MFT and Mama Elephant


Hi everyone, thank you for stopping by. I hope you're having a great day.

Today I wanted to share another card that I created using the smaller stamps in a set. This one is a mashup of My Favorite Things and Mama Elephant. I wanted to create something clean and simple but still fun, and who doesn't like to think of their birthday as a mini vacation? I know I do.

So thinking of a mini vacation makes me think of somewhere warm and tropical and so naturally it just came to this.


To begin, I stamped the parrot from MFT's "Polynesian Paradise" and the branch from Mama Elephant's "Lunar Extras" with Memento Tuxedo Black ink on 110lb Copic-friendly cardstock, coloured them with Copics and fussy cut them out.

I used Tumbled Glass Distress ink to sponge a background directly to the front of my standard A2 sized card base and stamped the birthday greeting with Memento Tuxedo Black ink.

Once the background was dry, I adhered the branch flat on the panel, then raised the parrot up on some foam tape and placed him on the branch.

To finish it off, I added a few enamel dots in coordinating colours around the stamped images.

I hope you liked today's card and are inspired to create something of your own. If you haven't already, please follow me on the right side bar or over on Facebook, so you don't miss any future posts. Drop me a line in the comments section below and let me know what you think.

This card is for:
2 Crafty Critter Crazies

Seize the Birthday

Addicted to Stamps and More

Wednesday, 18 October 2017

Floral Thoughts Series | ft. Prismacolor Watercolour Pencils


Hi everyone, thank you for stopping by. I hope you're having a great day.

Before I jump into Christmas, I thought I would share a card that has been sitting around my craft room for a while. We're descending rapidly into deep fall, yesterday it was t-shirt weather, today I sent my kids off to school in their winter jackets. That's life on the prairies. I'm sure tomorrow will be nice again, but today I wanted to extend the feeling of summer.


To begin, I stamped this floral image from Hero Arts (I don't remember the name of the stamp) on to 110lb white cardstock using CTMH Archival ink. I then used my Prismacolor watercolour pencils to shade in the areas where I wanted the most shadows and used clean water to pull the colour out.

When using water on regular cardstock - the trick is to make sure it is dry before adding more water. Luckily these pencils are fantastic for laying down layers and they blend so beautifully. If too much water is applied the paper will become gummy and your project will be ruined.

While that was drying I used some shimmering embossing paste through a stencil to create my background panel.

Once both panels were completely dry, I cut the floral image in half and used some super sticky two-way tape to adhere it to the embossed panel. I mounted those to a piece of silver shimmering cardstock from Recollections, leaving only the tiniest border and tied some yellow twine around them.

I then adhered those to the front of a standard A2 sized card base, and to finish it off I added a few enamel dots across the front.

I hope you like today's card and are inspired to create something of your own. If you haven't already, please follow me on the right side bar or over on Facebook, so you don't miss out on any future posts. Drop me a line in the comments section below and let me know what you think.

Tuesday, 17 October 2017

Hello Halloween Series | Watercolour Pumpkin Patch ft. MFT's "Witch Way is the Candy?"


Hi everyone, thank you for stopping by. I hope you're having a great day.

Today is the last (official) card for this year's Hello Halloween Series! Part of me is glad that it's over, it's been a long road, and another part of me is sad because I keep getting inspired by all the amazing work I'm seeing this year. So don't be too surprised if another couple cards pop up over the weeks to come.


To begin, I stamped the two pumpkins from MFT's "Witch Way is the Candy?" set with Antique Linen Distress ink on Strathmore 140lb cold press watercolour paper. If I were to redo this card, I probably would mask off the front pumpkins - I had thought that the water and other inks would lift the lines out completely but they didn't. But the more I look at it, the more "artsy and rustic" it felt and I really fell in love with it.

I then used Dried Marigold, Spiced Marmalade and Carved Pumpkin Distress inks to paint the pumpkins. I used just a bit of Scattered Straw to pull out the highlights. For the stems I used Forest Moss and Gathered Twigs.

After that was completely dry, I used very watered down Gathered Twigs for the ground and then added more pigment to create the shadows. The darkest shadows are made with Ground Espresso.

Once that was completely dry, I wet the area above the pumpkins with clean water and dropped in Weathered Wood and a bit of Faded Jeans to create the rest of the background, letting the water pull the ink away from the pumpkins and fade out.

The greeting is stamped from Verve's "Autumn Splendor using Forest Moss Distress ink, using the MISTI so I could ensure a good impression.

To finish off the card, I mounted the watercolour panel to a piece of dark green cardstock then adhered the whole lot to a standard A2 sized card base.

I hope you like today's card and are inspired to create something of your own. If you haven't already, please follow me on the right side bar or over on Facebook, so you don't miss out on any future posts. Drop me a line in the comments section below and let me know what you think.

This card is for:
MFT Color Challenge

Inspired by Kim Heggins
I pulled my inspiration from her colours and the crisp clean greeting at the top. And Halloween. YAY!


 Thank you all so much for your votes and support!

Monday, 16 October 2017

Growing Up Up Up | ft. MFT's "Up in the Air"


Hi everyone, thank you for stopping by. I hope you're having a great day.

Every year for my niece and nephew I make a card that coordinates with the theme for their birthday party. My sweet little niece turned three this year, and when I was talking to her mom it turns out that she never received her card for her second birthday.

Totally weird, because I have the sketch in my art journal from last year and I distinctly remember making the card but I couldn't find it any where! So I had to make a new card for her.


To begin, I prepped a piece of Strathmore 140lb cold press watercolour paper with my powder tool and stamped the hot air balloon images from MFT's "Up in the Air" set with VersaMark ink and then heat embossed them with clear.

Now if I were to remake this card, I would probably heat emboss in gold or silver - while it looks great in real life, the clear embossing does not pick up well on camera at all.

I then coloured the images with my Zig Clean Color Real Brush Markers and used my Prisma water brush to pull the colour out.

I heat embossed the greeting with the same clear powder and then used pinks over top of it to create an emboss resist. I die cut that with the banner die from the Blueprints die-namics, and popped it up on some foam tape.

I used some super strong two-way tape to adhere the watercolour piece to the scalloped panel die from MFT's Blueprint die-namics #27. Then I popped the whole piece up on some foam tape and then mounted that to the front of a standard A2 sized card base.

I hope you like today's card and are inspired to create something of your own. If you haven't already, please follow me on the right side bar or over on Facebook, so you don't miss any future posts. Drop me a line in the comments section below and let me know what you think.

Sunday, 15 October 2017

Product Review Series | Tonic Nuvo Gilding Flakes


Hi everyone, thank you for stopping by. I hope you're having a great day.

I love the look of metallics on my cards; and since I can't seem to get the hang of foiling (no joke) I recently turned to gilding flakes. I've seen several videos about them but never gave them much thought until I wanted to have some shiny bits on my cards. So I thought I would give them a whirl.

Today, I'm going to be doing a fairly in depth product review with my experiences using the Nuvo Gilding Flakes by Tonic Studios. You may remember from last week that I did the Nuvo Embellishment Mousse review, well as it turns out they make way more things. And I gotta say I'm a fan of all that I've tried. So don't be surprised if you see more Nuvo products in the weeks to come.

This is going to be an extensive post, so maybe grab a drink and enjoy!


The gilding flakes come in a pretty big jar: 200ml or 6.8 fluid ounces. I'm thinking they have to measure this by volume because these things are lighter than air and I doubt there is a difference between a full tub and an empty one. The price is quite reasonable (I paid $11.75 CAD at my local scrapbook store in Calgary). They are also widely available online.


Nuvo has released three amazing colours: Silver Bullion, Radiant Gold and Sunkissed Copper, unfortunately they have not released any other colours. I've been looking for a teal and I have had zero luck.


I wanted to include a close up of the flakes. I'm not kidding there is nothing to them. They are the finest, softest, lightest things that I have ever worked with. And that has made this a steep learning curve. Luckily because of how little you need and how many are in a jar I don't really feel all the bad about a few that floated away. Literally.


There are a few other things that you are going to need, depending on what you plan on doing with them. For the purposes of this review I have applied them in a couple different ways and there's a super fun technique that I'm going to touch on at the end. You will need:
  • Dry duster cloths. I'm showing the Swiffer brand here, but a box from the dollar store will work just as well. If you cut them in half, they last twice as long.
  • A stiff brush - I'm using a stenciling brush that came in a set of Faber-Castell Gelatos. I cut the bristles down by about half so that it would be a bit stiffer.
  • VersaMark ink and Sticky embossing powder by Ranger
  • Strong two-way tape (not pictured) I used 1/8" Skor tape
  • Glue Pen (not pictured) I used a Martha Stewart ballpoint-tip glue pen
  • Scrap paper to protect your work surface

So this looks like a hot mess, right? Well, you're right. At this point it is. A messy mess, to be completely honest; but I'll walk you through it.
  • For the top portion - I prepped the paper with my powder tool and stamped a pretty intricate snowflake using VersaMark ink. I then heat embossed that with Sticky Embossing Powder from Ranger. The trick here is to remove the heat as soon as the powder melts. You don't want to over-heat it or it won't be sticky any more. I then added the flakes.
  • For the middle portion - I added a strip of 1/8" Skor tape across the piece, removed the backing paper and added the flakes
  • For the middle portion - I used the glue pen, wrote a word and a little picture. And added the flakes. This one is a bit trickier - it has to be a glue that is permanent when wet but repositionable when dry. And when doing this, curb your enthusiasm because it really does need to dry. You'll see why down below.
Once the foil was covering the sticky stuff for all three sections, I use the stencil brush in an upright position and work in small circles with a light hand to brush away the flakes that are not attached to the glue. As you become more comfortable (which happens fast) you can apply more pressure.

**** Here's where it's messy. If you are one of those people that needs to breathe on a regular basis, do so with care. These flakes are incredibly light and with one sigh, they will go every where. I frequently found myself holding my breath - so maybe work in small batches.****


For each one, I did a different stamped image and drew a different little word. As you can see on the first and second (Copper and Gold) I was too enthusiastic and added flakes before my glue was ready for it. More so with the first but you can see it by the "S" in the second as well.

I chose to do these on black cardstock (65lb by Recollections) so you could really see the detail that you are able to achieve.


It then occurred to me, that I wouldn't just be using the flakes on my cards. I typically add something else to make the card interesting (at least I try). So here, I gilded the snowflake using the Silver Bullion, then I used Distress Ink to colour the background. I was super pleased to see that the flakes completely resisted the colour and more over weren't ruined by the rubbing of the sponge. So YAY!

Finally, as I was playing around I was thinking what other things I could do with them so I could get more out of my supplies. What crafter doesn't like that?


Using my MISTI I stamped this leaf with Memento Tuxedo Black ink on 110lb Copic-friendly cardstock, then coloured it with Copics.

I then put the paper back into the MISTI, prepped it with my powder tool and heat embossed the leaf, in the exact same position with the Sticky embossing powder by Ranger. I then used the Silver Bullion gilding flakes.

This would look absolutely stunning with more leaves in fall colours then gilded with the Sunkissed Copper or even the Radiant Gold. I can't wait to make a fall card like that. (Maybe you'll see one tomorrow.)

A couple of things to note:

  • If you have respiratory problems, it may be in your best interest to used one of those dust masks - super inexpensive, you can get them in a dollar store or hardware store. These flakes are tiny and after you use the stencil brush to burnish them away those flakes become dust. Gross as it sounds you'll be blowing gilding flakes out of your nose. Trust me.
  • Take your time. You know those sloths in the Zootopia movie, that work at the DMV? That is exactly how I feel when I'm working with these. Every movement seems so exaggerated and deliberate. But what's the alternative? A craft space filled with floating metallic flakes. No thank you.
  • Don't feel bad if you can't get them all back in the tub. These seem to puff up a bit when the tub opens, so if you have to toss them. Do it. Otherwise you can always put them in a Ziploc sandwich/freezer bag to use the next time.
Overall, I am in love! Despite my angst over not being able to foil, this fills the gap for me for now. I would love to get more colours but apparently no one wants me to have shiny pretty things unless they are copper, silver or gold. Maybe one day, and on that day I will be the first in line to get new colours. I love love love these.

If you have not tried gilding flakes yet, I highly recommend them and I can say from personal experience that Nuvo makes some excellent ones. There will be cards to come - who doesn't like something shiny on their Christmas card? At such an accessible price point it would be a real shame to pass this up. There are lots of ways to use them. And if you're glue pen is fine enough you can even embellish some things that are already stamped or written out. Maybe even a colouring book page. Just for that something extra.

Thank you for sticking to the end, I hope you enjoyed today's review. If you haven't already please follow me on the right side bar or over on Facebook, so you don't miss any future posts or reviews. If you have any questions about today's review or have a suggestion for a future review, please drop me a line in the comments section below. I would love to hear from you.

*disclaimer: I am not sent products to review, nor am I paid to review them. I review/compare the products that I use, that I find interesting and that I have purchased with my very own money. I receive no reward or incentive to review a product. All reviews are based on my personal experience while using the product and are my opinion only.

Saturday, 14 October 2017

Floral Thoughts Series | ft. Clearly Besotted "Fresh Flowers"


Hi everyone, thank you for stopping by. I hope you're having a great day.

I'm just going to say that deciding on which floral stamp to use was the hardest part for this card. When I saw Tracey's post I knew exactly what I wanted to do, but then all these beautiful flowers were just staring at me and I seemed to hit a bump.

I knew my colour palette, but choosing the flower was another story all together. I tried a few of them (because Clearly Besotted has some of the most amazing floral images - how would I decide?) and went with this one. It reminded me of the soft pink lilacs that used to grow in the front yard of the house I grew up in.


To begin, I stamped this floral image from Clearly Besotted's "Fresh Flowers" with Memento Tuxedo Black ink on 110lb Copic-friendly cardstock, then coloured it with Copic markers.

I then stamped the same image, using second generation stamping, randomly over my background panel. This was another reason for choosing this image. I liked how full the background looked, yet didn't get overly busy.

I mounted the smaller main image on a piece of pale pink cardstock and created a banner to wrap around. Then popped it up on foam tape.

I mounted the background panel on another piece of the same pink cardstock and adhered that to the front of my standard A2 sized card base.

I added my focus panel, and used clear Wink of Stella over the petals. Unfortunately that doesn't show up very well in the picture, but in real life this is crazy sparkly.

I hope you like today's card and are inspired to create something of your own. If you haven't already, please follow me on the right side bar or over on Facebook, so you don't miss out on any future posts. Drop me a line in the comments section below and let me know what you think.

This card is for:
Muse Card Challenge

Friday, 13 October 2017

Hello Halloween Series | Stamping Mashup


Hi everyone, thank you for stopping by. I hope you're having a great day.

Typically when I create a card - as well as many other card makers out there - we tend to stay within a brand. Not to say we don't own many brands, but I see very few cards that are a mashup of various companies all in the same card.

It makes sense for design teams or people working for a particular company, but for the solitary card maker in his or her own craft room? Not so much. And yet, I find myself doing just that; all the time.

Today, I wanted to share my stamping mashup. This card includes images from Close To My Heart, Simon Says Stamp, My Favorite Things and Recollections.


To begin, I stamped the cloth jar lid from Recollections using CTMH Goldrush ink on 110lb Copic-friendly cardstock, then masked that off; I stamped the larger jar using Memento Tuxedo Black ink and masked that, then stamped the smaller jar. Both the jars have a ring at the bottom of them (like under the frog) but I had done some stamp surgery long ago to take those out.

In the smaller jar, I stamped the toad from MFT's "Witch Way is the Candy?" set and used a 0.3 Staedtler pigment liner to draw the ring back in and some glass highlights.

I stamped the skulls in the larger jar from CTMH's "Frightfully Fun" set, and used the same pigment liner to draw twine around the top of the fabric lid.

I stamped the green ooze at the top from Simon Says Stamp's "Trick or Treat" set with CTMH Pear ink.

After all the stamping was done, I added the masks back to all the images and sponged on Hickory Smoke, Seedless Preserves and Dusty Concord Distress inks to the background.

Once that was dry, I removed all the masks and coloured the images with Copic marker. The greeting is from the CTMH set as well, stamped in Archival ink.

Finally I adhered the panel to a piece of black cardstock, then mounted the entire lot to the front of a standard A2 sized card base.

I hope you like today's card and are inspired to create something of your own. If you haven't already, please follow me on the right side bar or over on Facebook, so you don't miss out on any future posts. Drop me a line in the comments section below and let me know what you think.

Thursday, 12 October 2017

Hello Halloween Series | ft. MFT's "Witch Way is the Candy?"


Hi everyone, thank you for stopping by. I hope you're having a great day.

Today I wanted to share a card that uses one of the smaller stamps in the set. I've been challenging myself to step away from that big main awesome stamp that is always there and use the smaller "scene builder" stamps as my focus.

Today, I chose the bat from MFT's "Witch Way is the Candy?". This is an older set, that due to popular demand was brought back this year! I got mine when it originally came out, so I don't have all the new sentiments and greetings that were included in the new release; "witch" kind of makes me sad, because MFT has some amazing sayings that can fit in almost any card for any occasion.


To begin, I trimmed a piece of 110lb Copic-friendly cardstock down to 5 1/2" x 3 3/4" and stamped the Bat from MFT's "Witch Way is the Candy?" stamp set with Memento Tuxedo Black ink, masking to allow overlap and coloured them with Copic markers.

I then stamped the greeting from the same set with Memento ink as well. I used the Spectrum Noir Clear Overlay glitter pen to make all the bats shine and used Glossy Accents by Ranger on their eyes. I then sent the panel aside to dry completely.

On the right side of my standard A2 sized card base, I used the stripe border stamp and the MISTI to create a fun border. This could also be done with a spooky fun washi tape.

Once the top panel was dry, I popped it up on some foam tape and adhered it to the left side of my card base.

I hope you like today's card and are inspired to create something of your own. If you haven't already, please follow me on the right side bar or over on Facebook, so you don't miss out on any future posts. Drop me a line in the comments section below and let me know what you think.

This card is for:
For your blog

CAS(E) this Sketch!