Pages

Thursday, 30 November 2017

Happy Holidays Series | Classic Christmas ft. Lawn Fawn "Large Wreath" Die


Hi everyone, thank you for stopping by. I hope you're having a great day.

Welcome to the 14th card in this year's Happy Holidays Series. I sat on the fence about this die for a long time. I was well into my Holiday Series before I made the decision to get this, and I am so very glad that I did. We can all thank Pinterest for pushing me over the edge on this one.

Pinterest is that wonderful place where you discover you really NEED to have all the things you didn't think you even wanted. LOL

While my plan for this year's series was to do cute stuff focusing around the North Pole and Santa's Workshop I just couldn't resist tossing in a little elegance. This is one of my favourites from this year, and I wouldn't be entirely surprised if it made an appearance next year in the Happy Holidays Series.


To begin, I stamped the wood grain stamp from Lawn Fawn's "Wood Grain Backdrops" with CTMH Chocolate ink on 65lb kraft cardstock by Recollections. I then used Gathered Twigs Distress ink to darken the edges going lighter towards the centre.

I used the "Large Wreath" die to cut 3 sets (the die cuts 4 at a time) of the boughs from shimmering cardstock and once from white glitter cardstock. I used Tombow Mono Adhesive to glue the boughs in place around the stitched circle that comes with the die set. Once I had the majority of my shimmering boughs in place I added the glittering ones every couple of spaces.

I cut the bow from silver glitter cardstock and assembled that using liquid adhesive as well. I have found that if you cut a foam square in half, it just fits in the loops of the bows, so that even when compressed it will still retain some dimension and not just be squished flat. I used my reverse tweezers to hold the bow together while it dried, then adhered it to the bottom of my wreath.

To mount the wreath onto my background panel, I used 3/4" lengths of two-way tape to secure it in place all around the back of the circle, then mounted the panel to the front of a standard A2 sized card base.

I hope you like today's card and are inspired to create something of your own. If you haven't already, please follow me on the right side bar or over on Facebook, so you don't miss any future posts. Drop me a line in the comments section below and let me know what you think.

This card is for:
CASology Week 277

Simon Says Stamp Wednesday Challenge
Freshly Made Sketches

Wednesday, 29 November 2017

Inlaid Anniversary | ft. Stampin' Up "Rose Wonder" Dies


Hi everyone, thank you for stopping by. I hope you're having a great day.

Today I thought I would share a super fun technique where you use both the positive and the negative space of the die cuts to create a beautiful inlay design. I chose this die set because of all the pieces to work with, it's very much like a puzzle and I found it to be quite soothing to put together.

While I created this card with Anniversary in mind, it can easily be used as a shower card, a birthday card, a love card; and it doesn't have to be glitter paper, but really who doesn't want a card that sparkles like crazy in the light??


To begin, I used the large rose die cut from Stampin' Up's "Rose Wonder" set and die cut the flower from three different pieces of glitter cardstock.

I first cut down my panel from the medium pink then die cut the rose to get my base and I adhered the positive panel to a piece of cardstock that was cut down to be the same size.

I then cut the flower again from the darkest piece of glitter cardstock to get my outline. Finally I cut the flower from my lightest piece of glitter cardstock to get all the little pieces to inlay. If you have a package of Stick-It, this would be the time to use it. I did not have any so I went old school and used glue.

Much like a puzzle, I found it most efficient to work with the pieces that were obvious first, then made my way down through the smaller pieces. If you are lucky enough to have the paper stick in your die, it is even easier. I was not so lucky.

Because I didn't have Stick-It at the time, I covered my hidden background panel with wide two-way tape and worked slowly and carefully. The tape is quite strong so once it's down, it's down.

I prepped a strip of vellum with my powder tool and heat embossed the greeting from CTMH "Finding the Words" with white embossing powder and wrapped it around my panel to hide all of the adhesive.

I then mounted the completed panel to the front of a standard A2 sized card base. To finish off the card (because three types of glitter paper just doesn't sparkle enough) I adhered a few sequins across the panel using Aleene's Glass and Bead Adhesive.

Also, because I created this piece from three different card stocks, I can ultimately create three different cards! YAY!!

I hope you like today's card and are inspired to create something of your own. If you haven't already, please follow me on the right side bar or over on Facebook, so you don't miss any future posts. Drop me a line in the comments section below and let me know what you think.

Tuesday, 28 November 2017

Happy Holidays Series | Micro-Dimensional Scene ft. Lawn Fawn "Ready, Set, Snow"


Hi everyone, thank you for stopping by. I hope you're having a great day.

A couple of months ago, I created this Micro-Dimensional Scene and the response was huge! So I thought I would create another one for Christmas time; the Ready, Set, Snow set from Lawn Fawn is the perfect way to do this!


To begin, I stamped out the snow globe pieces with Memento Tuxedo Black ink on 110lb Copic-friendly cardstock, I coloured the images in with Copic markers and used the coordinating dies to cut them out. As you know, I'm not typically one for coordinating dies as I have the Brother 2 Scan N Cut (which is AMAZING) but for certain things, having the dies is incredibly helpful.

Over the falling snow background piece I used Nuvo Embellishment Mousse to get a soft blue shimmer. I adhered that to the back wall, then used a second frame piece to add just a touch of dimension. I adhered the houses to the front of the snowy border piece and then added another frame for just a bit more dimension.

I stamped Santa and his sleigh directly on to my acetate piece with Staz-On ink and adhered that to the top of the frame I had just put down. I then adhered my final frame (for a total of 3) to the top of that.

To finish it off I used Glossy Accents by Ranger over the greeting plaque and set the whole thing aside to dry completely. It only takes a couple hours for Glossy Accents to dry, but I like to err on the side of caution and left it over night.

For the background panel, I used a stencil I created with Lawn Fawn's "Stitched Hillside Border" dies and sponged on more of the Nuvo Embellishment Mousse to make it look like snow drifts. Though the mousse is shimmering, I used it on shimmering cardstock so there wouldn't be a stark contrast between where I sponged and the actual cardstock.

I adhered that panel to the front of a standard A2 sized card base, then used strong two-way tape to adhere my snow globe in place. It's a little difficult to see all the dimension that this piece has, but in real life it is quite apparent.

If you give micro-dimensional pieces a try, I would love to see them! I think you'll be amazed at how much dimension you can get while still minimizing the bulk on the card.

I hope you like today's card and are inspired to create something of your own. If you haven't already, please follow me on the right side bar or over on Facebook, so you don't miss any future posts. Drop me a line in the comments section below and let me know what you think.

Monday, 27 November 2017

Coloured on Kraft Series | Floral Thoughts of You ft. Stampin' Up "Birthday Blooms"


Hi everyone, thank you for stopping by. I hope you're having a great day.

Today I want to share a floral thinking of you card, coloured on kraft cardstock with Prismacolor Premier Coloured Pencils. The more I work with these pencils the more I absolutely love them. I like to look back through my work and see how far my colouring has progressed. As with any other medium the key is practice, practice, practice.

This image from Stampin' Up is perfect for practicing in any medium, and if you don't have it, I highly recommend getting one, or one like it.


To begin, I stamped the floral image from Stampin' Up "Birthday Blooms" and the greeting with VersaMark ink on 65lb kraft cardstock. I chose this particular ink because it doesn't have the harsh lines that stamping in black has, and it is easy to cover up with pencil; creating this beautiful "no-line" look.

I then coloured the blooms with only three shades! All the petals are coloured with PC1032 Pumpkin Orange, PC1002 Yellow Orange and PC915 Lemon Yellow. I start with my medium shade in the areas where I know I want the shadows to be the darkest. I then go to my lightest shade for the for the rest of the petal with an incredibly light hand, finally I add in my darkest shade to deepen those shadows and start to bring out the depth of the flower.

I work back and forth, doing one petal at a time from start to finish until it looks just how I want it to. Each of these petals has 8-10 layers of colour so it is very important that you use a very light hand, as Prismacolor pencils are waxed based there will come a point where you just can't add any more layers because of the waxy build-up. So it will take a while, but with the layers you can get almost any shade between your darkest and lightest pencils.

For the stamen in the centre of the flower I used PC923 and highlighted with the Lemon Yellow.

All of the leaves are coloured with PC988 Marine Green, PC1096 Kelly Green and then PC1089 Pale Sage, working the same as the blossoms, one leaf at a time until it looks just right. Because many of the leaves have texture from the veins, I ignore those until I'm adding the final details, then I gently go over them with the medium and then the darkest shade of green.

I have found that I get the best results from keeping my tip as sharp as possible all the time. This typically means a lot of sharpening, so I use the T'GAAL Multi-Sharpener on setting one to keep a low but sharp point. I can avoid losing a lot of pencil material, because let's face it - coloured pencils aren't cheap.

I hope you like today's card and are inspired to create something of your own. If you haven't already, please follow me on the right side bar or over on Facebook, so you don't miss any future posts. If you have any questions or just want to let me know what you think, please drop me a line in the comments section below. I love to hear from you!

Sunday, 26 November 2017

Product Review Series | Baby Oil for Blending Coloured Pencils


Hi everyone, thank you for stopping by. I hope you're having a great day.

A couple weeks ago, I reviewed Odorless Mineral Spirits, specifically Gamsol as a means for blending coloured pencil. In the hours and then days that followed I received a bunch of comments and mail and private messages about the post. Many people wanted to know how it compared to using baby oil, some of them wanted to know why I would promote such a dangerous chemical and some were so excited by the results, they said they were going right out to buy some.

I'm not here to tell you what to buy. I'm here to tell you about my experiences and hopefully share some knowledge to provide you with information if you are sitting on the fence about it. I will give you my opinions and my recommendations and I will happily answer any questions I can. Before we get right into this review, I want to clear a few things up.

Yes, Gamsol is a dangerous chemical; but when you get right down to it so are alcohol markers - if you don't use them correctly. So are oil paints and micro fine glitter. Anything can be dangerous if it isn't being used safely and carefully.

For those of you that messaged me to say they appreciated the information and will be picking some up, I cannot wait to see what you create with it. If it is something new, practice, practice and more practice is the key.

Finally, I've never tried baby oil as a blender. So today that's what I'm going to be talking about. This week, I put away my Gamsol and pulled out my baby oil. I wanted to give it a fair shake.


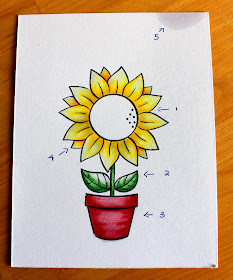
For the purposes of this review, I stamped these images from Lawn Fawn's "Our Friendship Grows" using Memento Tuxedo Black ink on 110lb Copic-friendly cardstock. I will be using:
  • Prismacolor Premier Pencils
  • Life Brand Baby Oil
  • Blending stubs or Tortillions (rolled, not compressed)


As with my review on Gamsol, I added the colour where I wanted the deepest shadows to be. I chose this image from Lawn Fawn because it has large spaces that are excellent for practicing laying down colour or shading. I used a separate tortillion for each colour to avoid cross-contamination.


I've numbered each of the points I want to talk about when working on this image.

  1. Large petals. For these I used PC917 Sunburst Yellow. As with Gamsol, I dipped my blending stub into the oil and worked in little circles, starting on the pigment and pulling it out towards the tips. I found that the yellow moved surprisingly well for the most part. The petals on the right of the flower seemed to move better than those on the left even though I lay down about the same amount of pigment. I found I had to dip several times as the paper sucked up the oil very quickly.
  2. Leaves and stem. I used PC908 Dark Green. I found that the oil smoothed out the pencil lines and filled in the areas where the tooth of the paper did not grab the pigment but it did not carry the colour into the unshaded areas - as you can see most prominently on the left leaf. To get an even blend, I had to work the area several times to move the green as much as I did.
  3. The pot. I used PC937 Tuscan Red. The colour did not move at all. I ended up going over the red a bunch of times and finally added a second layer with a super light hand just to get some colour in the middle. If you look at the pot in the picture above and change the lightest areas to stark white, that's what it looked like before I added a second layer. As a side note, I didn't notice any problems when adding additional pigment to the image on top of the baby oil.
  4. Smaller petals. I used PC917 and PC1002 Yellow Orange. As these petals are behind the main flower image, they will naturally be darker, so I added the second colour just at the very base of each petal to give it a bit more shadow. I found the baby oil blended the two colours nicely and as with the yellow in the larger petals moved the pigment to the tips well.
  5. I had an oops and dripped baby oil to the corner of my panel. I've done this with the Gamsol and it dries right up and you can't tell. Not so much with the baby oil. It was there in the second picture after I lay down the initial colour, and I had hoped it would dry out, but as you can see, even after blending the colours in the image that "oops" is still there. Not cool.
Overall, this is not my blending solution of choice. I found it was way more work than it was worth. If this panel were going to be going on a card, I would have to scrap it and start over because of that drip in the top right corner. 

It didn't move the colour as well as I wanted and I found I had to make many extra passes just to get the colour to move as well as it did. 

I do not like the oily finish that it leaves. If I were creating a piece to look like stained glass for a window decoration maybe I would reach for this, but I don't really do those.

If you are uncomfortable using Gamsol for medical reasons or pregnancy or because you have a kitten or kids that have access to your crafting space then by all means, give this a try. As I mentioned in the previous review, I prefer using an incredibly light hand and allowing my pencils to do the blending for me. If I were in a situation where I had to use a blending solution, I'll take the Gamsol over the baby oil any day of the week.

I hope you enjoyed today's review. If you have questions about this product or a suggestion for a future review, please drop me a line in the comments section below and let me know what you think. If you haven't already, please follow me on the right side bar or over on Facebook, so you don't miss any future reviews or posts.

*disclaimer: I am not sent products to review, nor am I paid to review them. I review the products that I am interested in and use, I receive no incentive, reward or payment to do so. All products are purchased with my own money and all reviews are based off of my experience and are my opinions only.

Saturday, 25 November 2017

Happy Holidays Series | ft. Lawn Fawn "Here We Go A-Waddling"


Hi everyone, thank you for stopping by. I hope you're having a great day.

This card was inspired by a Muse Challenge that I had entered a few weeks back. I was very inspired by the sketch and jotted it down, so when it came time to make some Christmas cards and I looked at my book, this card was born.


To begin, I masked off the top and bottom to create a slash where my colour would be. I then sponged on Tumbled Glass Distress ink to give it a very light look. I waited for that to dry and heat embossed the music notes from the set with clear embossing powder.

I then stamped out the caroling penguins with Memento Tuxedo Black ink and coloured them with Copics, then popped them up on some foam tape.

To make the slash of colour get progressively darker I added Broken China and Salty Ocean Distress inks with a heavier hand the higher up I got.

Finally I stamped the greeting from the same set with CTMH Archival ink. I chose this ink just in case my Distress ink wasn't completely dry. Archival ink is waterproof and won't run over the (almost dry) Distress ink.

I mounted everything on the front of a standard A2 sized card base.

I hope you like today's card and are inspired to create something of your own. If you haven't already, please follow me on the right side bar or over on Facebook, so you don't miss any future posts. Drop me a line in the comments section below and let me know what you think.

Friday, 24 November 2017

Love You Forever | ft. Lawn Fawn "Booyah"


Hi everyone, thank you for stopping by. I hope you're having a great day.

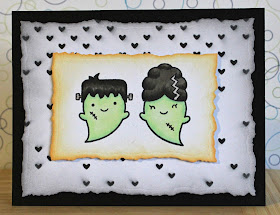
Today I thought I would share a card I had created a long time ago, but never got around to posting. I created this card for all the horror movie watching, zombie loving crazies like me who would truly have their houses decked out in Halloween gear all year round if they didn't think their families would question their sanity. I tip my hat to the people who do it anyway.

I created this card for those people and to celebrate their love the way only they can.


To begin, I stamped both the hair pieces from the Booyah stamp set by Lawn Fawn, masked them off and then stamped the ghosts, using Memento Tuxedo Black ink on 110lb Copic-friendly cardstock. I then coloured the images with Copic markers and added a couple stitches.

I die cut them using a smaller torn paper die and sponged Dried Marigold Distress ink around the edges. I popped that up on some foam tape and set it aside.

For my background panel, I die cut one of the larger torn paper dies and used the Falling Hearts stencil by Simon Says Stamp with Black Soot Distress ink to fill in the background. I took some Hickory Smoke Distress ink and sponged along the edges so it wouldn't be such a stark contrast.

I adhered the heart panel to the front of a standard A2 sized card base in black, then adhered my panel with the ghosts.

On the inside it says "Love you Forever" in CTMH Cranberry ink.

I hope you like today's card and are inspired to create something of your own. If you haven't already, please follow me on the right side bar or over on Facebook, so you don't miss any future posts. Drop me a line in the comments section below and let me know what you think.

If anyone happens to know the name of the "torn paper" die I keep referring to, please let me know! I know that they are nesting dies and there are maybe 5 in the set, they look like Spellbinder but I can't find them anywhere. Help!!

Thursday, 23 November 2017

Happy Holidays Series | ft. Mama Elephant "Reindeer Games"


Hi everyone, thank you for stopping by. I hope you're having a great day.

Today I thought I would take a little break from the Lawn Fawn stamps (don't worry, there will be many more from them this season) and showcase the Reindeer Games stamp set by Mama Elephant.

I think this set came out last year, and do you think I could get my hands on it? Nope! This set was out of stock for months and months. I finally got a hold of it this year in August or maybe September. While the wait was incredibly frustrating, I am glad I persisted. I love these little guys.


To begin, I stamped all my reindeer using the MISTI so I could get perfect placement, with Memento Tuxedo Black ink on 110lb Copic-friendly cardstock. I then stamped the little star to fill in some of the gaps. I coloured all the images in with Copic markers.

I used Wink of Stella clear glitter pen on their tags and the stars then covered them with Glossy Accents by Ranger.

I stamped the greeting from Lawn Fawn on a strip of paper and then created a matted border using dark green cardstock for both the strip and the coloured panel.

I adhered everything to the front of a standard A2 sized card base.

I hope you like today's card and are inspired to create something of your own. If you haven't already, please follow me on the right side bar or over on Facebook, so you don't miss any future posts. Drop me a line in the comments section below and let me know what you think.

This card is for:
2 Crafty Critter Crazies

Wednesday, 22 November 2017

Masculine Monotone | ft. Stampin' Up "The Open Sea"


Hi everyone, thank you for stopping by. I hope you're having a great day.

Today, I wanted to share another masculine card that I created. This time using "The Open Sea" stamp set by Stampin' Up. I discovered, once I found the design that I liked, this card is very easy to reproduce and can be done so in any colour palette. It doesn't have to be monochrome, but I think it lends a very classy look to it.

This design could easily be used for any occasion, it all depends on what you put on the inside. I used this one for a birthday card.


To begin, I stamped the ledger image using CTMH Chocolate ink in the upper left corner of my panel, I then stamped it a second time offset down and to the right - without reinking my stamp. I love the way second generation stamping gives that antique faded look.

I then stamped the ship on a scrap of cardstock and cut it out using one of my oval dies from Spellbinder. I cut a cross piece from the same white paper.

I used a very dark brown cardstock to create border layers for all my pieces and then assembled them on the front of my standard A2 sized card base.

I hope you like today's card and are inspired to create something of your own. If you haven't already, please follow me on the right side bar or over on Facebook, so you don't miss any future posts. Drop me a line in the comments section below and let me know what you think.

Tuesday, 21 November 2017

Happy Holidays Series | Sparkling Surprise ft. Lawn Fawn "For You, Deer"


Hi everyone, thank you for stopping by. I hope you're having a great day.

Yesterday was the first day that I haven't posted since the beginning of July. I'd like to tell you it was because I was super busy getting ready for Christmas. But I wasn't. I had coffee with a friend in the morning and the rest of the day got away from me. It wasn't until I was getting ready for bed that I even realized it. And by then I was too tired to post. So I apologize.

To make up for it, I have a super cute card featuring Lawn Fawn stamps and dies (no surprise there!). I knew I wanted to make a card where you could pull out the bookmark, but I still wanted the card to be pretty without that main focus piece. And while some may think there is too much sparkle, I think it turned out rather well.


To begin, I cut the large snowflake from Lawn Fawn's "Stitched Snowflakes" dies from the top centre of a piece of silver glitter paper. I used the panel or positive space of the cut for my front panel. Over my background, I lined up the snowflake and adhered all those little pieces that we normally just toss away.

I cut a piece of shimmering paper for my greetings banner and stamped the Happy Holidays using VersaMark ink and heat embossed with silver powder.

On a piece of 110lb Copic-friendly cardstock I stamped the front and back of the deer tag from "For You, Deer" with Memento Tuxedo Black ink and coloured him with Copics. I placed the tag inside the snowflake (as you can see in the photo above) and built up my foam tape around him.

I adhered the sparkling panel to the front of my shimmering panel and then mounted the whole piece to the front of a standard A2 sized card base.


I stamped the little message on to a piece of blue shimmering cardstock and put the tag together. I then added a red gem for his nose and some baker's twine through the top of the tag.

Now, even when the recipient removes the tag, the card is still pretty enough to keep on display!

I hope you like today's card and are inspired to create something of your own. If you haven't already, please follow me on the right side bar or over on Facebook, so you don't miss any future posts. Drop me a line in the comments section below and let me know what you think.

Sunday, 19 November 2017

Clean and Simple Birthday | ft. Newton's Nook "Newton's Birthday Bash"


Hi everyone, thank you for stopping by. I hope you're having a great day.

Today, I thought I would share a birthday card for any cat lover on your list. I'm running a bit behind today, as we had the kids Christmas party this morning and then I got to doing other things. I'd like to tell you that they were super important things, but really they weren't. It's been quite a lazy day, in fact.


To begin, I stamped the kitty image and the greeting from "Newton's Birthday Bash" with Memento Tuxedo Black ink on 110lb Copic-friendly cardstock and coloured him with Copic markers.

I then tied a length of 1/8" ribbon around the top. To finish it off I added bright red glitter to his hat and the ribbons of the gifts.

I adhered this panel to the front of a standard A2 sized card base.

I hope you like today's card and are inspired to create something of your own. If you haven't already, please follow me on the right side bar or over on Facebook, so you don't miss any future posts. Drop me a line in the comments section below and let me know what you think.

Saturday, 18 November 2017

Happy Holidays Series | Single Layer Wreath ft. Lawn Fawn "Deck the Halls"


Hi everyone, thank you for stopping by. I hope you're having a great day.

If you have been following me for any length of time, you know that I love single layer cards. I know that technically a single layer card is a card that is right on the front of the card base, but I like to think that a mostly single layer card (where it all really happens on one panel) totally counts as a single layer as well.

So far this year, you've seen many cutesy Holiday cards in the series, many of which were done using Lawn Fawn's stamps. And this one is no different, except for the cutesy part. Despite being best known for their sweet little critters, Lawn Fawn also puts out some excellent sets that can be used in a more classical arrangement.

Like this wreath, for example.


To begin, I traced a light circle with a pencil so that I would know where the curve of my wreath should be. I then mounted all the boughs from Lawn Fawn's "Deck the Halls" set on my acrylic blocks and stamped them, starting with the largest using CTMH inks in Ponderosa Pine, New England Ivy and Topiary.

Once the boughs were dry, I prepped the panel with my powder tool and stamped the pine cone and greeting using VersaMark ink and heat embossed them with gold embossing powder. I then mounted the panel on a piece of dark green cardstock and adhered that to the front of my standard A2 sized card base.

To finish off the card I added some adhesive gems from my stash to look like berries.

I think that this card would be super fun in a non-traditional palette, for example my house gets done up in blues and silvers for the Holidays, so I could make this card with silver boughs and blue pine cones or vise versa. It's always fun to make things coordinate. At least I think so.

I hope you like today's card and are inspired to create something of your own. If you haven't already, please follow me on the right side bar or over on Facebook, so you don't miss any future posts. Drop me a line in the comments section below and let me know what you think.

Friday, 17 November 2017

Hippie Hello | ft. Forever In Time "Sunshine Daisies"


Hi everyone, thank you for stopping by. I hope you're having a great day.

You know how your Mom or you Grandmother would have different decorations for each season? Different framed pictures on the walls, different throw pillows and colour schemes depending on the time of the year? Just to keep things fresh. Well, I've decided that it's time for that to be me.

I recently had my first Dollar Tree experience, I couldn't believe I had never been there before. I got an entire set of Autumn dishes (large plates and bowls) for like $20!!! For eight place settings!

Last week, my Mother and I were back at Dollar Tree looking for a set of Winter dishes (because why wouldn't I buy another set?) and I came across a set of clear stamps by Forever In Time. I had used their embellishment products before because they are super inexpensive but I had no idea that they made stamps. So I figured why not? At $1.25 for the set what did I really have to lose?


I started by stamping out the largest daisy with Memento Tuxedo Black ink on 110lb Copic-friendly cardstock. I then did the medium size, then the smallest. My intent was to create a patterned paper for a background.

It wasn't until they were all stamped out and coloured with Copic markers that it struck me as a very "Hippie" background. I then did something, that I had never even considered before.

I coloured the background with Copic markers. I know that seems pretty common, but I'm kinda cheap and the idea of using a Copic (not cheap) to fill in such a large area was somehow terrifying to me. But I am sooo glad that I did.

Once the entire panel was coloured I remembered I needed a greeting. So I prepped the whole piece with my powder tool and stamped the "hello friend" from Stampendous in VersaMark ink and heat embossed it in white. Now typically, that's where I would leave it, but even with the contrast between the white and the colours the text seemed to get lost. To solve this, I took my 0.3 Staedtler pigment liner and carefully traces around the embossing to make the letters really pop.

I created a splatter looking using a bit of watered down Copic Opaque white and a clean brush. On the front of my standard A2 sized card base, I sponged on some Broken China Distress Oxide ink just around the edges and then adhered my hippie panel to the front.

I wasn't really expecting much from this stamp set, I expected a low quality that didn't hold the ink very well that I would probably end up tossing. But I can honestly say that I have paid more for other "more popular brands" that frustrated me to no end. These worked better than I had ever thought. They certainly aren't perfect, but considering I paid $1.25 for a set of 10 stamps, I'll definitely purchase any others that I happen to come across.

I hope you like today's card and are inspired to create something of your own. If you haven't already, please follow me on the right side bar or over on Facebook, so you don't miss any future posts. Drop me a line in the comments section below and let me know what you think.

Thursday, 16 November 2017

Happy Holidays Series | Foxy Winter ft. Lawn Fawn "Into the Woods"


Hi everyone, thank you for stopping by. I hope you're having a great day.

I've mentioned previously that it was Lawn Fawn that started me out making cards. Not directly, of course, I'm sure they have no idea who I am. But it was a tiny fox on Pinterest and that was the beginning for me.

This little fox was the start of an amazing journey into paper-crafting and it has boomed for me since then. Lawn Fawn remains my number one stash item, and you may have noticed from the cards in this year's Holiday Series that they are generally my first choice when it comes to crafting.

And we all have this sweet little fox to thank.


To begin, I stamped the fox from Lawn Fawn's "Into the Woods" stamp set with Memento Tuxedo Black ink on 110lb Copic-friendly cardstock. I then masked him off and stamped the wood log using CTMH's Saddle ink.

I masked off the log and used Broken China Distress ink to create a halo around him. I then mixed Mother of Pearl Structure Paste with Tumbled Glass Distress ink to create a shimmering soft blue. I laid down my snowflake stencil by Hot Off the Press and put my paste through that.

Any time you are using embossing paste always be sure to clean your tools quickly. I use warm soapy water and a stiff nail brush to ensure I get it all out of the stencil, then hang the stencil to dry.

I removed the masks and coloured my fox with Copic markers. Once the structure paste had dried a bit, I prepped the top corner with my powder tool and stamped the greeting from CTMH's "Sending Smiles" with VersaMark embossing ink and heat embossed with silver powder.

I set the panel aside to dry completely and sponged Broken China Distress Oxide Ink around the edges of my standard A2 sized card base. Once the ink had dried I adhered the panel to the front.

I hope you like today's card and are inspired to create something of your own. If you haven't already, please follow me on the right side bar or over on Facebook, so you don't miss any future posts. Drop me a line in the comments section below and let me know what you think.

This card is for:
Lawn Fawnatics Challange

Simon Says Stamp Wednesday Challenge

2 Crafty Critter Crazies

Merry Monday Christmas Challenge
Copy our badge for your blog.

Wednesday, 15 November 2017

Floral Thoughts Series | Get Well ft. Clearly Besotted "Miniature Florals Collection"


Hi everyone, thank you for stopping by. I hope you're having a great day.

Today, I wanted to share a card where I use a small floral image with some masking to create a little bouquet. I chose the Black Eye'd Susan from Clearly Besotted's "Miniature Florals Collection". 

I absolutely love the floral images that Clearly Besotted has, and to make it even better, they took their large images and shrunk them down to create the Miniature Florals. Not only is this handy if you aren't looking for a big flower, but you can also finish off the inside of the card using the smaller version. Clever!


To begin, I stamped the flower on the left on Strathmore 140lb cold press watercolour paper using CTMH Archival ink. Archival ink is waterproof and the one from Close to my Heart gives an excellent crisp impression. I then stamped off that flower and stamped the middle, masked that one and stamped the one on the right.

As I wanted the one on the right to be the shortest, I used just a piece of scrap paper to mask the bottom part of the paper so that the stem wouldn't be hanging down.

I removed the masks and used my Zig Clean Color Real Brush markers to colour the images in. Once those were dry, I used clean water to dampen the background and scribbled on the light blue randomly, then used more water to pull the colour out and get rid of the harsh lines.

Once the panel was completely dry, I prepped the top left with my powder tool and heat embossed the greeting using gold embossing powder.

To finish off the card I took some gold thread and looped it about the bottom a few times and tied it off, cutting the loops of the bow.

Using super strong two-way tape I adhered the watercolour panel to the front of a standard A2 sized card base. I then decided that the flowers needed to shine a bit, so I added clear Wink of Stella over the blossoms.

I hope you like today's card and are inspired to create something of your own. If you haven't already, please follow me on the right side bar or over on Facebook, so you don't miss any future posts. Drop me a line in the comments section below and let me know what you think.

Tuesday, 14 November 2017

Happy Holidays Series | Watercolour Trees ft. Stampin' Up "Lovely As a Tree"


Hi everyone, thank you for stopping by. I hope you're having a great day.

I have surprisingly few Stampin' Up sets considering how lovely they can be. I find myself very torn on them. They are either completely elegant or far too basic for my tastes. This particular set, "Lovely As a Tree" is by far one of my most favourites. The trees can be used with any palette and various mediums to create the most beautiful cards for any occasion and they are excellent for masculine cards; an area in which I struggle.

This card took me a couple tries to get the way I wanted, and even then I'm sure I could play around with it some more to get it absolutely perfect.


To begin, I cut down a piece of Strathmore 140lb cold press watercolour paper and put it in my MISTI. I then positioned the tall evergreen stamp starting with the far right tree. I used my Distress markers to colour directly on the stamp then spritzed it with a very fine mist of water and held the MISTI lid shut. I found that if I held it shut for about 30 seconds, the ink would transfer and give this very loose look to the image.

I repeated this process with the tree on the left. I let them both dry completely then repeated it again with the tree in the middle.

I stamped the greeting from Hero Arts "CL722" using the same markers as I did with the trees, but did not spritz the water. Because of the texture of the paper, I had to restamp the greeting several times to get a good solid impression.

I added a piece of teal shimmering tape down the right side and popped the watercolour panel up on foam tape and adhered it to the front of a standard A2 sized card base.

Depending on your preference, you could do this with any palette so long as the colours blend nicely together. You wouldn't want to use colours that would muddy up the image when the mix.

I hope you like today's card and are inspired to create something of your own. If you haven't already, please follow me on the right side bar or over on Facebook, so you don't miss any future posts. Drop me a line in the comments section below and let me know what you think.

This card is for:
Muse Challenge #242


 Thank you all so much for your votes and support. I really cannot tell you how much it means to me.

Monday, 13 November 2017

Technique Tip: Raised Focus Panel | ft. Stampin' Up "Birthday Blossoms"


Hi everyone, thank you for stopping by. I hope you're having a great day.

Today I wanted to share a fun technique that gives you a raised focus panel while keeping the whole image fluid through the card. If you have a stamping tool like the MISTI this technique is incredibly easy to do; you can still do this if you don't have a stamping tool by using an acrylic block with clear stamps or a stamp-a-ma-jig stamp positioner.


To begin, I placed my folded A2 sized card base in the corner of my MISTI and positioned the large floral image from Stampin' Up's "Birthday Blossoms" where I wanted it to be. I stamped it with Memento Tuxedo Black ink, as the focus is going to be coloured with Copic markers, I wanted the black to be consistent through both levels.

I then used the small torn paper die to cut my focus panel and placed that right over top of the card base in the MISTI. I used a piece of washi tape and the magnets to hold that in place so that there would be no slipping, and stamped the image again.

I coloured the image on the smaller panel with Copic markers and added the greeting from CTMH's "Sending Smiles" set in the top right corner.

I raised the small panel up on foam tape and lined it up so that the image looked continuous. To finish off the card, I added clear Wink of Stella over the coloured petals and the centre of the flower.

If you don't have a MISTI or a stamping positioner, you can also stamp the image on your panel, then run it through you die cut machine to get the smaller panel from the centre. You'll only have to stamp the image one time. I recommend that you make sure your card base is the same paper as what will be your bottom panel, in case someone tries to peak.

I hope you like today's card and are inspired to create something of your own. If you haven't already, please follow me on the right side bar or over on Facebook, so you don't miss any future posts. Drop me a line in the comments section below and let me know what you think.

This card is for:
The Flower Challenge

Sunday, 12 November 2017

Product Review Series | Odorless Mineral Spirits; Gamsol


Hi everyone, thank you for stopping by. I hope you're having a great day.

I have received quite a few questions regarding Odorless Mineral Spirits (OMS), which I use and how to use them. So for today's review I will be discussing Gamsol.


Gamsol is an artist's grade OMS that can be purchased at your local art supply store or online for a relatively low cost. While it truly is odorless there are still vapors and you must use adequate ventilation. Do NOT inhale, taste, swallow or get in contact with eyes. Avoid contact with skin.

  • Relatively inexpensive. I paid $16.40 for 16 fluid ounces (1 pint or 2 cups) at my local art store in Calgary.
  • Absolutely odorless
  • Clear liquid
  • Locking Top


It's not really practical to keep it in it's original container for small crafty uses such as colouring with pencils. I have mine stored two ways.

  • The first (left) is in a top press bottle - this allows you to press a small amount for dipping and avoids terrible spills. 
  • The second (right) is in a small baby food jar. I added a craft sponge to the bottom so I can just dip my blending stub. This is how I carry it when I am travelling.
Always keep you containers tightly sealed and away from children and pets. It really does look like water so please be smart and safe whenever you work with any type of chemical.


For blending, I use very inexpensive blending stumps. The ones on the left are my preferred type; they are basically rolled up paper and can be purchased for just pennies a piece. The ones on the right are more compact and will absorb a lot more of the OMS, this is good if you are trying to blend a large area in the background or a large image, I don't typically do that - but I have a couple. Just in case.

I prefer to have one blending stump per colour so that they don't cross contaminate. There is nothing worse than going to blend a light colour and having a different colour smear over because there was pigment left over.

If having individual stumps is not practical for you, you can always clean off the stumps on a scrap of paper or by using a piece of find sanding paper.


For the purpose of this example I have stamped the dog from Simon Says Stamp's "You are Pawesome" stamp set with Memento Tuxedo Black ink on 110lb cardstock.

The top image is coloured with Prismacolor Premier coloured pencils. These are a soft core wax-based pencil.

The bottom image is coloured with Faber-Castell Polychormos coloured pencils. These are a hard core oil-based pencil.

When using Gamsol with coloured pencils, I lay the colour down where I want the shadows to be the darkest (as you can see in the picture above).


Once I have my shadows places, I dip my blending stub in the OMS and work in small circles pulling the colour towards the centre. With both of these images I applied the Gamsol, then used a lighter brown and repeated the process, pulling the colour towards the centre again.

My observations:

  • The Gamsol worked far better on the wax-based colour pencil (top) than it did on the oil-based (bottom). I found I had to work harder to move the colour with the oil-based pencils with less of a result.
  • While the OMS did blend out the harsh lines in the oil-based image, it did not get rid of them completely and you are still able to see pencils lines even though I went over it a few times more than I did with the wax-based image.
  • The colour stayed truer with the wax pencils, while it brightened the colour of the oil pencil. Handy to know if that's what you're going for.
  • Does not leave a residue or "oily" mark on paper after it has dried.
Overall, I don't typically use OMS when working with coloured pencil. I will pull it out if I can't get the blend I want, or if I'm using a paper with a lot of tooth, but for the most part I use the colours themselves to get my blend. I don't use the blending pencils at all. 

If your paper has a lot of tooth (you can see this by the little white dots that get left behind after you lay down your coloured pencil) the OMS will help to get an even coverage by "melting" the pigment and allowing it to settle in those spaces.

If you're in a hurry to get something done or you just want to play around I highly recommend using the OMS - it will "dissolve" the waxy build up and allow you to apply more layers of colour. For me, I prefer to use a light hand and layer, layer, layer the pencil to get the look I want.

If you are going to purchase an OMS - go for the good stuff. Don't mess around with cheap products that give off an odor of paint thinner. You'll just end up with a headache and be unhappy with final result. Always work in a well ventilated area and close the lid of your container when you aren't using it. 


I hope you enjoyed today's review. If you have any questions about this product or a suggestion for a future review, drop me a line in the comments section below, I love to hear from you. If you haven't already, please follow me on the right side bar or over on Facebook, so you don't miss any future posts.

*disclaimer: I am not sent products to review, nor am I paid to review them. I review the products that I use and that I have paid for with my own money. I am not rewarded, paid or provided with incentive to do so. All reviews are based on my personal experience with the product and are my opinions only.

Saturday, 11 November 2017

Happy Holidays Series | Scripty Wishes ft. Lawn Fawn and Distress Oxide Ink


Hi everyone, thank you for stopping by. I hope you're having a great day.

Welcome to the sixth day in this year's Happy Holidays Series. Today I wanted to go a little less cute and a bit more classic. Once again this card features mainly Lawn Fawn - I honestly cannot get enough of their products (quite literally).

This design is excellent for the those on the list who aren't into the cutesy scenes. With the MISTI a design like this can easily be reproduced to get a stack of cards that are ready to go.


To begin, I trimmed down a piece of Strathmore Bristol Smooth cardstock to slightly smaller than a standard A2 sized card base. I then prepped it with my powder tool and put it in my MISTI. I lined up a bunch of the scripty greetings from Lawn Fawn's "Winter Scripty Sayings" and stamped them with VersaMark ink.

I heat embossed them with clear embossing powder, then used Salty Ocean and Broken China Distress Oxide inks to create an ombre background. I then used clean water to create a splatter and patted it dry with paper towel.

Finally, I adhered the panel to the front of my card base and then added some glittering silver snowflakes that I cut using the "Mini Snowflake" dies by Lawn Fawn.

I hope you like today's card and are inspired to create something of your own. If you haven't already, please follow me on the right side bar or over on Facebook, so you don't miss any future posts. Drop me a line in the comments section below and let me know what you think.

Friday, 10 November 2017

Clean and Simple Masculine Birthday


Hi everyone, thank you for stopping by. I hope you're having a great day.

Today I wanted to share a masculine birthday card I created using a bit of masking and some simple Distress ink sponging. I have found that the simplest of designs can pack a big punch, and this is no different. If you know your recipient prefers blues or greens or browns or any other colour, you can always switch it up.

Gotta love it when a design can be changed a bit to make a big difference.


To cut the front panel, I used the positive space from a torn paper die that I had cut for another card. I popped that up on some foam tape.

On the front of the standard A2 sized card base, I used 1" Post-It tape to mask off some vertical stripes. I used Forest Moss for the large green, Gathered Twigs for the one on the right and Vintage Photo for the one on the left.

I then stamped the "Happy Birthday" greeting from Recollects with CTMH Archival ink. Any time I stamp over Distress ink, I prefer to use Archival to avoid any bleeding that may occur.

I then added the frame to the front of the card.

I hope you like today's card and are inspired to create something of your own. If you haven't already, please follow me on the right side bar or over on Facebook, so you don't miss any future posts. Drop me a line in the comments section below and let me know what you think.

This card is for:
CAS(E) This Sketch

Thursday, 9 November 2017

Happy Holidays Series | From Santa Shaker ft. Lawn Fawn


Hi everyone, thank you for stopping by. I hope you're having a great day.

It's the fifth day in my Happy Holidays Series for 2017, and today I wanted to share a super fun card all dressed up like a gift with a shaker tag.

You may have noticed that many of these cards are based on Lawn Fawn products. You aren't wrong. Not only does Lawn Fawn take up easily half of my stash, these stamps are so interchangeable that it's hard NOT to use them.


To begin, I used the tag die from "Tag, You're It" to cut out two tags from from 110lb Copic friendly cardstock. I then used a small rectangle die from Spellbinders to cut a window in one of them. On the back tag, I stamped the pine tree from "Critters in the Forest" and added a few decorations. Then coloured that with Copics.

On a scrap of paper I partially stamped the Gnome from "Gnome Sweet Gnome" and added the Santa hat from "Hats off to you". I cut him out using the Brother 2 Scan N Cut and coloured him with Copics.

I used Mowed Lawn Distress ink to add green to the frame of the top tag and then added my acetate to the back. I used a single layer of foam tape and filled my shaker with chunky glitter from Recollections.

For the back panel, I wrapped a piece of cardstock with some Christmas wrapping paper and added the ribbon. I adhered that to the front of a standard A2 sized card base then adhered my tag in place. Finally, to finish off the card I added a bow with a length of the same ribbon.

I hope you like today's card and are inspired to create something of your own. If you haven't already, please follow me on the right side bar or over on Facebook, so you don't miss any future posts. Drop me a line in the comments section below and let me know what you think.

Wednesday, 8 November 2017

Coloured on Kraft | Dogwood Birthday ft. Hero Arts "Dogwood"


Hi everyone, thank you for stopping by. I hope you're having a great day.

Today I wanted to share a soft floral card featuring the "Dogwood" stamp by Hero Arts with Prismacolor Premier Pencils. This image has large florals that are perfect for practicing your colouring in any medium. My stamp is mounted on wood, but can easily be taken off to turn it into a cling stamp for an acrylic block or the MISTI.

I think this design would work for nearly any occasion and can be used for a top fold or a side fold card. Let's face it, stamps are not cheap and if it can be used year round, all the better.


To begin, I stamped the large Dogwood floral image from Hero Arts with VersaMark ink on a standard A2 sized card base made of 65lb Kraft cardstock by Recollections. I masked off the image and stamped again so there would be no overlap. I chose to use VersaMark ink as it creates a lovely tone on tone look without super harsh lines.

I then used white and cream to colour the petals. I added a soft yellow for the middle and a very light green for the leaves. I didn't colour in the stems or branches as there was enough texture in the stamp to look shaded and I wanted the blossoms to be the star of the show.

I stamped the birthday greeting with CTMH White Daisy ink, then cut that down to a banner and adhered that to the top right corner of the card. My original plan was to have the greeting straight on the card base, but there was an incident and it needed to be covered up.

I hope you like today's card and are inspired to create something of your own. If you haven't already, please follow me on the right side bar or over on Facebook, so you don't miss any future posts. Drop me a line in the comments section below and let me know what you think.

Tuesday, 7 November 2017

Happy Holidays Series | Gingerbread Wishes ft. Lawn Fawn "Sweet Christmas"


Hi everyone, thank you for stopping by. I hope you're having a great day.

Today's card was super fun to make. I always feel intimidated at the beginning of the season. It feels like a lot of pressure to have ten or twelve or twenty new cards to share every year, but once I get started the ideas just start rolling in. Even without getting a bunch of new supplies.

Once you hit that mode it can be frustrating to keep them all straight, I've started keeping a sketchbook nearby for when inspiration hits. That way I can get the idea out of my head and not feel so overwhelmed when I sit down to start something.


To begin, I die cut a tag using Lawn Fawn's "Tag, You're It" die set from 110lb Copic-friendly paper. I stamped the gingerbread couple from "Sweet Christmas" using Memento Tuxedo Black ink, the "To and From" are from the "Thank You Tags" stamp set.

I used Mowed Lawn Distress ink to add a bit of colour to the edges and coloured the two images with Copic markers.

I used the same gingerbread people and a bunch of the candies from "Sweet Christmas" with VersaMark ink to create a tone on tone background on a piece of 65lb kraft cardstock by Recollections.

I wrapped a length of 1/8" red ribbon around the top of the panel and threaded that through the tag. I created a tiny bow and adhered that in place.

I mounted the whole thing to the front of a standard A2 sized card base. To stop the tag from sliding back and forth along the ribbon, I just secured it down with a piece of two-way tape.

I hope you like today's card and are inspired to create something of your own. If you haven't already, please follow me on the right side bar or over on Facebook, so you don't miss any future posts. Drop me a line in the comments section below and let me know what you think.

This card is for:
Christmas Cards All Year Round
November Challenge
Christmas Cards All Year Round

Monday, 6 November 2017

A Little More Autumn | ft. Lawn Fawn


Hi everyone, thank you for stopping by. I hope you're having a great day.

Now that the weather has broken a bit, I thought I'd recreate a fall card that I made ages ago, and share it with you. The last few years we have had some wonderful autumns, but they always seem so short.

While my house still says "Halloween", I'm starting to think about how I want it to be for the winter season, I typically do blues and silvers about this time of year, then at the beginning of December the tree goes up and gets decorated.


To begin, I used the "Stitched Leaves" dies from Lawn Fawn to cut the three large leaves from 110lb cardstock. I used Distress inks to make them look like autumn leaves.

I used a torn paper die to create my panel from the same cardstock and stamped the greeting using Lawn Fawn Black Licorice ink.

I adhered the leaves together using liquid glue, just to give myself a bit of time to have them arranged perfectly. I added a length of natural twine around the front panel, then popped the panel up on foam tape and adhered it to the front of a standard A2 sized card base, in brown.

I hope you like today's card and are inspired to create something of your own. If you haven't already, please follow me on the right side bar or over on Facebook, so you don't miss any future posts. Drop me a line in the comments section below and let me know what you think.

This card is for:
Muse Card Challenge


 Thank you all so much for you votes and Support!

Sunday, 5 November 2017

Masculine In Green | ft. Inkadinkado


Hi everyone, thank you for stopping by. I hope you're having a great day.

Sadly, the last few days have been rather off for me, so I don't have a product review for you today. I am hoping to put one up in the next couple of days to make up for it.

I do, however, have a masculine (or autumn) card to share today. This card is quite simple to make, and if you use a stamping tool like the MISTI you could easily mass produce a card like this.


To begin, I cut a piece of 110lb Copic-friendly cardstock to a standard A2 size, then stamped the maple leaf image in the middle with Memento Tuxedo Black ink, masked that, then stamped the one above and below it, masked those then stamped the top and the bottom.

I removed the masks and coloured the images with Copic markers.

I used a Happy Birthday Die from Spellbinders to cut out three or four layers of cardstock. I used liquid adhesive to hold them together then used the same shades of green to colour the top layer.

I ran the words through my Xyron "X" sticker maker and adhered them to the panel. I then mounted the panel on the front of a standard A2 sized card base.

I hope you like today's card and are inspired to create something of your own. If you haven't already, please follow me over on the right side bar or over on Facebook, so you don't miss any future posts. Drop me a line in the comments section below and let me know what you think.

Saturday, 4 November 2017

Floral Thoughts Series | ft. Inky Antics "Potted Violet"


Hi everyone, thank you for stopping by. I hope you're having a great day.

I'm still feeling a bit blah today, the news yesterday still sits with me, and we are in our fourth or fifth day straight of snow and gray skies (I'm pretty sure I get the SADs), so I thought I would share a bright floral to try and help us all through this week. I suppose I assume that you all feel the same as I do, makes me feel not so alone on this side of the keyboard.

While I typically take great care with my Copic colouring, I was very loose and (almost) carefree with this one; especially the flowers. While I like to make it appear as if there are white highlights in my colouring, especially the florals, I think this is the first time I've ever actually left them white. On purpose!


To begin, I stamped the floral portion of this image with Memento Tuxedo Black ink on 110lb Copic-friendly cardstock. I then masked off the bottom edge and stamped the pot. Both these images are from Inky Antics "Potted Violet" stamp set.

I removed the mask and coloured the image in with Copic markers. I didn't want the flowers to be floating in the middle of nothing, so I used some of the warm grey markers to create a shadow.

I prepped the lower right corner of the panel with my powder tool and heat embossed the greeting from CTMH "Sending Smiles" with gold embossing powder.

To finish off the card, I popped the panel up on some foam tape, I used a thin glittered tape at the top and bottom of the card base and adhered my top panel.

I hope you like today's card and are inspired to create something of your own. If you haven't already, please follow me on the right side bar or over on Facebook, so you don't miss out on any future posts. Drop me a line in the comments section below and let me know what you think.

This card is for:
Flower Challenge

Crafts Galore Challenge

Friday, 3 November 2017

Wintery Sympathy


Hi everyone, thank you for stopping by. I hope you're having a great day.

I'm not feeling very festive this morning. I just got word that my dear friend lost her dog this morning. She was an older farm dog with a heart of gold. Despite being a giant Rottweiler, she thought she was a tiny little lap dog that always wanted to snuggle. She adopted me and my kids as part of her family and loved to have us all around her. Since a puppy she has always been fiercely protective of the children and the property; she lived a great life with lots of room to run. If there is a doggy heaven, I'm sure she's chasing birds there now.

I'm sorry it's not a cheery post, but sometimes it's more about the emotions than it is about the season. 


I'm not sharing the process today as I feel it would cheapen the day of our sadness. I hope you all understand.

I hope to be back on track tomorrow, with something more festive to share.

I hope you like today's card and are inspired to create something of your own. If you haven't already, please follow me on the right side bar or over on Facebook, so you don't miss any future posts. Drop me a line in the comments section below and let me know what you think.

Thursday, 2 November 2017

Happy Holidays Series | Yeti, it's Cold! ft. Lawn Fawn "Yeti, Set, Go"


Hi everyone, thank you for stopping by. I hope you're having a great day.

Well, winter has finally hit us here. It's cold and snowy and the roads are just crazy. It happens every year. As soon as the snow hits the ground, people forget how to drive. It never ceases to amaze me.

Today I want to share the third card in my Happy Holidays Series, featuring two sets from Lawn Fawn. Both are older, but still wonderful!


To begin, I stamped the red portion from Lawn Fawn's "Argyle Backdrops" using Tulip ink from CTMH, I used the MISTI as this is one that will need to be stamped a couple times to get a good impression.

Once that was dry, (it takes a bit, especially when you stamp two or three times) I stamped the stitching from the same set using CTMH Archival ink. This black ink gives a nice impression, and if the red dye ink is still a little wet it won't bleed.

I then stamped the Yeti from Lawn Fawn's "Yeti, Set, Go!" set with Memento Tuxedo Black ink on 110lb Copic-friendly cardstock. I masked him off and stamped his earmuffs and the trees around him. I cut him out using the Brother 2 Scan N Cut, which is way faster than fussy cutting him with scissors.

I coloured him with Copic markers and popped him up on some foam tape. I then cut a banner piece out of dark green cardstock by Recollections and white heat embossed my greeting.

I used the same green cardstock to create a border for my panel and adhered all the pieces to the front of a standard A2 sized card base.

I hope you like today's card and are inspired to create something of your own. If you haven't already, please follow me on the right side bar or over on Facebook, so you don't miss any future posts. Drop me a line in the comments section below and let me know what you think.

This card is for:
Addicted to Stamps and More